Revamped Dining Chairs with Corey from Hey There Home ~ Hi There! I’m thrilled to be here at The DIY Dreamer today to share these dining chairs that I revamped! I’ve been in the planning stages of a dining room makeover for some time and this is the first of the big projects that I get to check off my list! I love the way they look and they are going to add to the collected look that I am striving for!
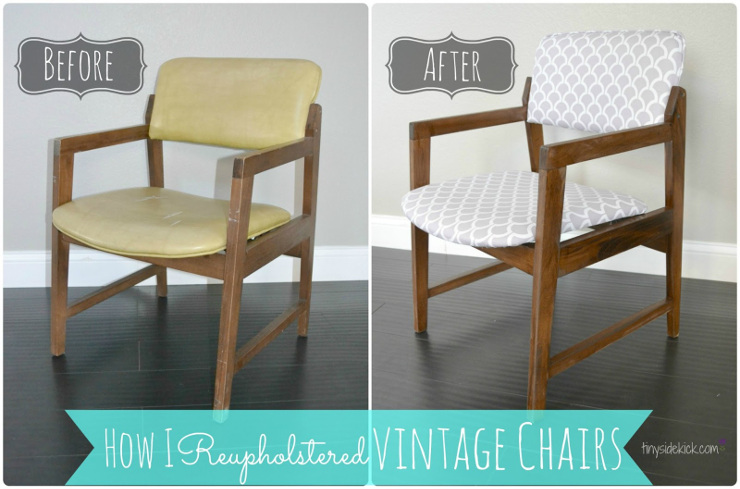

I am a huge Craigslist junkie so when I was browsing one Saturday and saw these dining chairs for only 60 bucks (for all 6 of them) my hamsters started running at full speed! I had pinned a mid century dining chair that had almost these exact lines that I couldn’t get out of my head. And 10 dollars a chair! A no brainer! So here is how the transformation went…
This post contains some affiliate links for your convenience. Click here to read my full disclosure policy.
How to Reupholster Vintage Dining Chairs


Restoring the Wood Frames


First I had to take the dining chairs apart which, in this case, was pretty easy because the screws were in plain sight. I made note of how they came apart, because I would have to put them back together the same way, and labeled baggies to store my screws based on where they came from.


I spent the afternoon, just my chair frames and I, in the backyard sanding (and scraping gum..so gross.) I used an electric sander and 100 grit sand paper to remove the old finish but keep the wood nice and smooth.
Once that was done, I cleaned them using a damp towel and gave them a nice coat of stain. I used Minwax in Dark Walnut.
Reupholstering the Seat Cushions

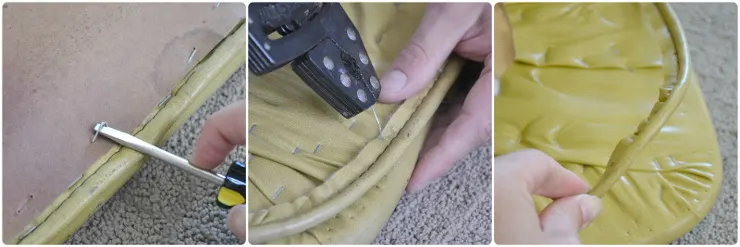
So it turns out that the gum situation on the wood frames was nothing in comparison to the yuck I found on the seat cushions. The previous owners of these dining chairs had invited some gum chewers with NO manners to dinner. It kept me quite entertained as I took out one staple after another.
These chairs were covered in vinyl, which I decided to keep for the waterproof factor and because I didn’t want to have to get into replacing the cushions underneath. I used a flat head screwdriver to lift out the staples that held on the cardboard cover and to remove the piping, which I reused later. (**if a staple gets stuck, use a pair of pliers to yank it out.) Then, I gave each cushion a good cleaning with a paper towel and cleaner so they wouldn’t get the new fabric dirty.


(**Before cutting decide which way you want your fabric to go on your finished product and be sure to check that it is going the right way before cutting each piece.) I laid each seat cushion on my fabric as a guide for where to cut. I cut about 3-4 inches away from the edge of each seat cushion and ironed out the wrinkles from the backside of the fabric. Then, I laid the seat cushion back onto my piece of fabric, print side down, (**double check the direction of the fabric again) folded one edge up and over and secured it using a staple gun in 3 places making sure not to secure it too close to the corners. I did the same thing on the opposite edge making sure to pull the fabric tight across the seat cushion. Then, repeated for the other 2 edges.

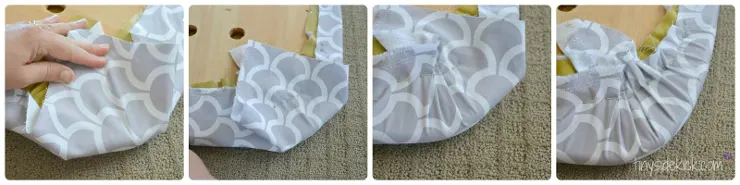
The corners are tricky because you don’t want to have any creases on the top of the cushion. Here is what worked for me. I pulled the corner up tightly and secured it with staples. Then I gathered a little bit of fabric at a time and moved it around until I only had creases on the underside of the cushion and stapled it in place. You will get the hang of this really quickly.


When you are done the underside will look like a mess, but the top will be nice and clean!


Seat cushion #1 done…5 to go!
The Seat Backs:
The seat backs required a little bit of sewing. I decided that I liked the piping detail on these and wanted to mimic the same thing so I had to come up with a pattern. Now, you should know that I am not a master seamstress. I have pretty much taught myself through trial and error, but hey, it seams seems to work!
How to make a pattern:


I found a scrap piece of fabric (part of an old flat sheet) and laid my seat back on it. Then, I cut around it leaving about 3-4 inches. I repeated the same steps to make a piece for the back, but you could just double the fabric and do one cut…duh me! I sandwiched the seat back between the two pieces and pinched the fabric together where I wanted the final seam to be and pinned my pattern fabric together. (**Notice that my pins run along the back side of the top of the seat back. This is because I want my piping to be in this location, so I actually will have more fabric for the front pieces of my seat backs…see the picture below..to account for the rounded edge here.)


When it is pinned in place on 3 sides, double check to make sure it is taunt and smooth, then take the seat back out.


Finally, I cut out the shape, using my pins as a guide, leaving about 1 inch for seam allowance. Label each side (I used “F” for Front and “B” for Back…I know, so sophisticated) so that you know which one is which, but also so you know which side will be facing out. This side will ultimately be the side with the print on it.
The Piping:
I ended up reusing the piping that I took off of the seat cushions. I don’t have a picture, but I took off the vinyl that you see below and used the piping inside. I then measured out how long it needed to be by laying it along the existing piping on the seat backs and cut it to size. I cut a 2 inch wide strip of my fabric (be sure it goes in the direction you want) so that when I fold it over the piping I will have 1 inch on each side. This will also act as my seam guide later….I know, sometimes I impress myself…hahaha!


The Seat Backs:


Time to cut out some pretty fabric for my seat backs! So, lay out your fabric print side down paying attention to the direction of your print and how you want it to go. Then, lay your pattern piece face down also (your “F” or “B” will be face down) and cut right along the pattern. I don’t bother pinning it together, but you could if you wanted to. Repeat with the other piece of your pattern again paying attention to the direction of your pattern. Sorry I keep repeating this, but it is so important!


Fold back the edge of your top piece of fabric and lay your piping in place. Remember how you cut 2 inch wide strips? Well now you can simply line up the edge of the piping (folded over it is 1 inch) along the sides of the fabric and you will have your sewing line too! The rounded part of the piping will go inward as shown. Pin all the way around, making sure that you line up the edges. Now you are ready to sew them together!


So using the piping as your 1 inch seam guide sew away! I used a zipper foot so that I could get as close as possible to the piping. In fact, I realized that I had to run each seat back through the machine twice (see the picture? The inner stitch is my second round.) The second time I was able to get much closer to the piping. You want your piping to be tight for the best look.


You can cut off some of the excess fabric so that it doesn’t make your chair look lumpy.


Almost there! After turning the cover right side out, I put it on the seat back and adjusted it so that the piping was in the right spot and then to finish it off I used a staple gun. I pulled the fabric tight down the front side and secured it with a staple then did the corners sort of like I was wrapping a present. For the last seam I folded it under before stapling it so that it had a finished look.
When I finished all of this, it was time for the big moment…putting them back together!


I’ll be honest, this project was a biggie…but so worth it! Between mommyhood, and life, and some other projects, I had to work in stages but the end result was sooooo worth it! I mean common’ where could you find dining chairs for about 20 bucks each? I.love.them.
Thank you so much for reading and a big THANKS to Christine for having me today!
Here are some of my other furniture finds and Re-Dos!
Removable Slip Covered Ottoman


Spray Painted Plastic Outdoor Chairs


And some Tips to find your own furniture worthy of TLC!


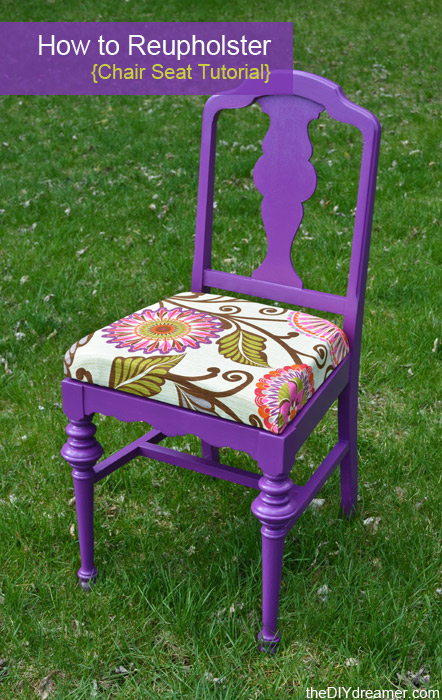
Looking for another reupholstering tutorial? Check this one out:
How to Reupholster a Chair

Michelle
Tuesday 29th of October 2013
Goodness that's beautiful!
Wendy
Tuesday 27th of August 2013
Hi Christine, This is awesome! Thanks for sharing Corey on your blog. Love all your projects.
New to following you!
Wendy @ effiegirl.blogspot.com
Toodie
Saturday 27th of July 2013
Love the fabric you chose. What a great makeover.
GlamorousMommy
Thursday 25th of July 2013
Wow, what a fantastic makeover!! Isn't it amazing what a little fabric can do ;) Thanks so much for sharing at All Things Thursday!
Fotini
Kathryn
Wednesday 24th of July 2013
I love your choice of fabric! That chair is awesome! Great job!