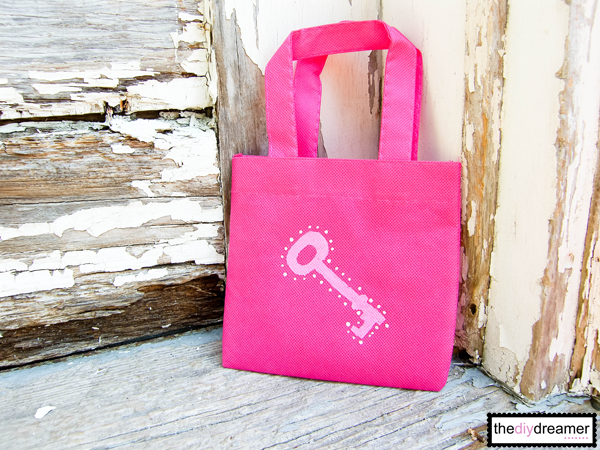
Painted Mini Totes
I was walking through the dollar store a few weeks ago and came across some cute mini tote bags. It was a set of 3 for $1. They are the size of little favor bags. I just adored their size, perfect for my girls to travel little toys (like their Pet Shops) or even their makeup. The only thing is I found that the bag was missing something.. like a design. So I decided to paint little designs on them.

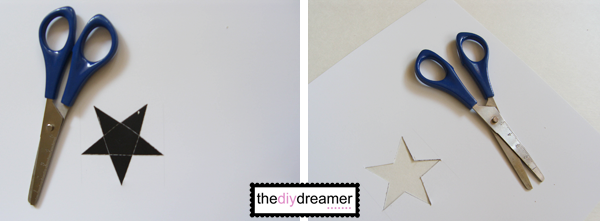
Gabrielle and I made our very own stencils. She decided what she wanted as stencils, we searched through Google for images and printed them on card-stock (we wanted our stencils thick)…. then we would cut out the inside of the images. Once we cut out the inside we cut a square around the stencil.
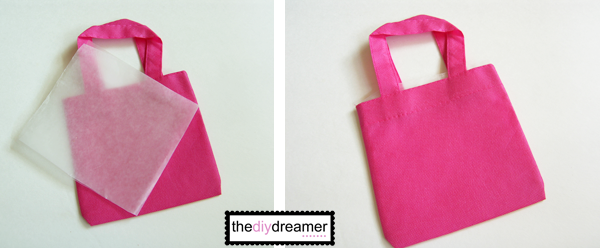
I then took out some wax paper, folded it in half and inserted it inside the bag. I did this to protect the other side of the bag. I figured if we would put too much paint, the wax paper would prevent the paint from soaking through to the other side of the bag. (Thank goodness we did, because it really did protect the bag).

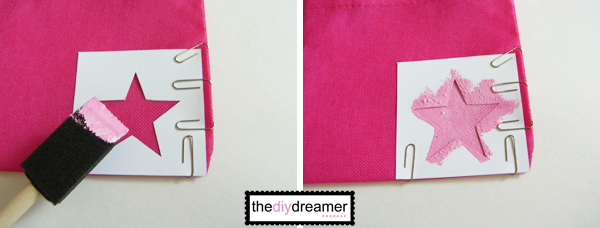
We then removed our stencil and took out our dot tool so that we could put little paint dots around our new design.


Ready to see our painted mini bags?


Christine these area adorable! I stink at stenciling and this is a great way for me to get some practice in!
I’m with Danni – I always seem to botch the paint and smear – 3 for $1? getting some!
JoAnn
What a great idea! Your girls have the coolest mommy! ;)
I nominated you for a ‘Very Inspiring Blogger’ award. Come and see at http://noshingwiththenolands.com/celebrating-my-six-month-blogiversary-with-a-very-inspiring-blogger-award/ Congratulations!!!
Cute!
so cute! thanks for stopping by my blog
These look cute! I’ve just bought a stencil, wonder how it’ll look on a tote like this! xo Anja
These are so freakin cute! I hope you can come by and link up to my first blog hop! You can win a $25 Amazon Gift Card http://www.missinformationblog.com/2012/08/its-best-of-your-best-blog-hop-and-win.html
These are very sweet. I’m always attracted to those little tote bags for something special for my granddaughters, and this is an idea that looks doable. Thanks for sharing it. Gail (BibleLoveNotes.com)
This is so cute. Love this and the color of the bag too:)
Already your follower, just hopping by:)
The Quiet Mom blogging @ How to Cook Fresh Artichoke Recipe
Also, don’t miss this: 12 Major Reasons to Use Self-Hosted WordPress for Blogging and Selling Your Products Online + Custom Blog or Social Network Button Giveaway
This is absolutely adorable!! I love the colors and 3 for a dollar? That makes it even better! My daughter is only 17 months old, but I think she would love to carry around one of these and put little toys inside. I might be borrowing this idea if my dollar store doesn’t let me down ;) I would love if you stopped by and shared this {and anything else you’d like to share} at my Throwback Thursday party {closes tomorrow night}. I hope to see you there! Thanks for sharing :) http://www.hubbymademe.com/throwback-thursday-no-4/
These would be awesome for favors at a birthday party. Fill them with goodies and there you have it!
New follower from Think Pink Sunday!
The Pretty Pinhead
It’s party time over at Debt Free Mommy Blog! Please come by and link up your spaces with Making Space Mondays link party #10. I hope to see you there at http://www.debtfreemommyblog.blogspot.com! -Tabitha
Hello! Stopping by from the Marvelous Monday link up at Jam’s Corner. This is such a cute idea– I love it! I hope you’ll visit me at jugglingactmama.blogspot.com
Absolutely adorable! I know that our readers will love it, too. If you get a chance we would love for you add your craft to our weekly Bowdabra Showcase. http://bowdabrablog.com/2012/08/04/saturday-showcase-craft-projects-13/
Love your simple painted pink totes. I too have painted on totes which I had made. That was before I started blogging :)
Christine! I did almost the same think last week on Dollar Tree totes too :) I got the slightly larger ones for busy bags for our Disneyland trip. I did a Mickey on mine – so cute! Thanks so much for sharing at Mom On Timeout!
Very cute project!
Hi Christine,
Now this is great! Simple,cheap,and cute. Great combination!
I would like to invite you to share this–and all your other great projects) on the Mommy Blog Craft Exchange. If you have a moment please check it out here:
http://www.cookthetv.com/2012/08/want-to-pin-more-of-your-blog.html
Thanks and keep crafting:) Di{CookTheTV}
I love that “key” tote!! Very creative~
Angie
http://www.swededreamer.blogspot.com
Very cute! Looks like a fun craft to do with little ones. Thanks so much for sharing at Etcetorize this week!
Christine,
These came out adorable! Thanks for sharing at Creative Thursday each week. I appreciate YOU! Can’t wait to see what you link up next :)
Michelle
These are so cute! Great for gift bags. Thanks for sharing on Marvelous Mondays!
Julie
Super cute! I would have picked them up for a dollar too! I love the key.. so fun!
Thanks so much for linking up to Financial Friday last week! I hope to see ya there tomorrow at 7!
So cute I love the dots around them, thanks for coming to the blog hop I hope you will be back tomorrow for I freakin did it Friday!
Those bags are so cute! Thanks so much for linking up to our Pinteresting Party!
Those bags are so cute! Thanks so much for linking up to our Pinteresting Party!
Those bags are so cute! Thanks so much for linking up to our Pinteresting Party!
So, so cute!
Perfect for a party.. :)
THanks for sharing.
XO
Angie
Just to let you know, I featured your wonderful project today. If you have a moment, stop by and grab a featured button. Thank you so much for sharing your project on homework. http://carolynshomework.blogspot.com/2012/08/the-inspiration-board-link-party_10.html
Love this so much!! featured it on Serenity Saturday party
and I also have a new address http://www.serenityyou.com
love them perfect for back to school come see what we shared at http://shopannies.blogspot.com
What sweet bags! My girls would love those! Thanks for sharing them with us this week! Have a good one!
Take care,
Trish
These are super cute! I hope to see these linked up at my Pinworthy Projects Party!
These would be such a fun kid’s craft party idea! Pinning :)
Thanks so much for sharing this at our Weekend Wonders party! We hope to see you back again on Thursday :) Have a great week!
Cute! Thanks for sharing at Shine on Fridays!
This would definitely be a great craft project to do with kids. So pretty and lots of fun to make, too! Thanks, Christine, for sharing this at the Crafty Saturday Party! We will be featuring this at the party ^^) I can’t wait to see what you have in store for us this week!
hugs,
Lelanie