How to hide the back of a TV – TV Room Divider
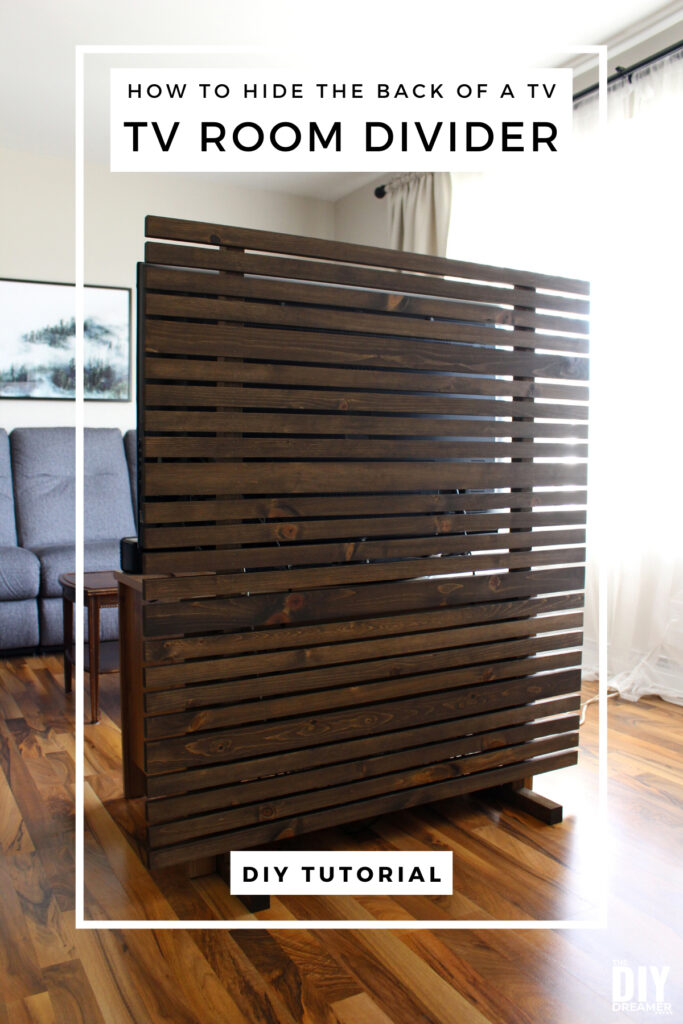
Learn how to hide the back of a TV in the middle of a room with this DIY room divider. This TV room divider is the perfect solution to allow you to have your TV in the middle of a room while hiding the back of it. It can also be used as a privacy screen, portable wall or freestanding wall to divide a room without building a wall.

TV in the middle of the room
We have been wanting to buy a sectional couch for our living room for a few years now. We finally got it in January. We absolutely adore it! It’s really nice having the whole family sitting and relaxing on the same couch.
Next thing we wanted to get was a bigger television, not because the television doesn’t work anymore but because we are finding it a little hard to see. The television is in the corner at the other end of the living room, diagonal to the couch.
We started measuring the space where the television is to see how much bigger we could get without disrupting the entryway. It’s a 32 inch television that is over 10 years old.
We realized quickly we couldn’t get anything much bigger than what we currently have. Of course TVs now don’t have such a big frame, so technically we could get something a little bigger with more screen size but nothing much bigger.
For the fun of it, I asked my husband if we could move the TV stand closer to the couch for now until we figure out a solution.
Once we moved it closer, we realized the TV was the perfect viewing size from that distance.
We laughed and both looked at each other saying we can’t really leave the TV stand in the middle of the room, can we? Yet, it solved our television situation and quite honestly, we liked how it made our living room feel more homey.
The issue with having the television in the middle of the room though is seeing all the wires in the back.
We thought about putting a desk behind it but it didn’t hide enough of the TV. Then we thought maybe we could make a small room divider that would just hide the back of the TV.
We both liked the idea of making a portable room divider that would hide the back of the TV. We wanted the TV room divider to be portable in case we decide to move the TV in front of our large window during Christmas time. I always have to think about our Christmas tree. hehe
We started planning on how to build it right away.
We measured our TV and stand, taking in consideration the opening at the bottom of the TV stand. We wanted the legs to fit inside the bottom of the TV stand. We also wanted the TV room divider to only be slightly bigger than the TV and TV stand, so that we had enough space to circulate around it to get to and from the couch.
This post contains some affiliate links for your convenience. Click here to read my full disclosure policy.
How to build a room divider to hide the back of a tv
To make a room divider that measures 44″ wide by 51″ high.
*You’ll need to change the height and length of your pieces if you want a bigger room divider.
Supplies:
- 2x 2″x2″x8″
- 3x 1″x8″x8″ pine boards
- Nails
- 2.5″ screws
- Wood glue
- Stain
- Foam brush
- Shop towels
Tools:
Cut List:
- 2″x2″s cut at these lengths
- 2x 49.25″
- 2x 12″
- 2x 8″ with 40 degree angle on one end and 50 degree angle on the opposite end.
- 1″x8″ cut at these lengths
- 20x 1.5″ x 44″
- 4x 2⅜″ x 44″
Instructions:
Step 1: Use a miter saw to cut the 2x2s at these lengths: 2x 49.25″, 2x 12″, and 2x 8″ with 40 degree angle on one end and 50 degree angle on the opposite end, the shorter side will be a little less than 5″ long.


Step 2: Cut the 3 1x8s to 44 inches long with a miter saw. This will give you 6 boards at 44 inches long.
In other words, cut each board in half, like below.


Step 3: Use a table saw to cut the 6 boards lengthwise into 20x 1.5″ strips and 4x 2⅜″ strips.


Step 4: Add one pocket hole using a Kreg pocket-hole jig on each of the 2x 49.25″ pieces, 2 inches from the bottom.


Step 5: Sand each piece using sand paper or an orbital sander.


Step 6: Remove the dust from the wood pieces.


Step 7: Stain all the pieces of wood.
If you are using paint to stain, you can use this staining method.
For this project I used an all in one stain. I applied the stain with a foam brush, I let it stand for 3 minutes, then I removed the extra stain using a shop towel. It’s the same method I used to stain a tabletop.


Allow to dry.
Repeat this process on the other side of the strips and the edges.
Step 8: Time to attach the pieces together.
We started by placing a level across the back of the TV unit. It doesn’t have to be a level, we just used that because it was close by and it was long enough to go across the legs of the TV unit.
Then we placed the two 49.25″ pieces on the inside of the TV unit legs, making sure the pocket holes were directly on the floor and towards the bottom. (The top of the room divider for the TV was what was up against the TV unit.) We measured the space between both 49.25″ pieces and it came up to 28″.


To help keep the space between the two 49.25″ pieces at 28″, we placed a piece of scrap 2×2 measuring 28″ in between. We slid the piece down as we attached the strips to the pieces.

We placed one 1.5″ strip centered over the two 49.25″ pieces.

We used a brad nailer to attach the strip to the two 49.25″ pieces. We started with one nail on each end, then added a second nail a below the first nails.


To keep the spacing the same between each strip, we attached one paint stick to each end of a yardstick using painters’ tape. That gave a spacing of 3/8″.
We placed the yardstick under the strip, placed the next strip underneath, and attached the strip using a brad nailer.


We proceeded with that method until we had 4 strips attached.
Then we added a 2⅜″ strip and continued with 4 strips of 1.5″.


The pattern was 4 strips of 1.5″, 1 strip of 2⅜″, 4 strips of 1.5″, 1 strip of 2⅜″, 4 strips of 1.5″, 1 strip of 2⅜″, 4 strips of 1.5″, 1 strip of 2⅜″, and 4 strips of 1.5″. This left us with a space of 1.25″ at the bottom.

Step 9: Next, it’s time to add feet to the panel to transform it into a freestanding TV room divider.
Put the two 12″ pieces on the ground with a space of 28″.

With the help of someone, place the panel over the two pieces on the ground. The panel’s 2x2s are to be centered on top of the two 12″ pieces, which should leave a space of approximately 5 ⅛″ on each end.

Drill 2.5″ screws into the pocket holes.


Then place the two remaining pieces (8″ pieces with 40 degree angle on one end and 50 degree angle on the opposite end) on the ends of the feet, going over the pocket holes, this will make triangles.
Fasten each end of the pieces with brad nails. You can also add carpenters glue before adding brad nails.


Step 10: Place the TV room divider in the desired location.
I would recommend attaching anti-tip brackets or braces to secure the TV room divider onto the TV unit to help baby proof it.


TV Room Divider


We absolutely love our TV room divider. It’s lightweight and can be moved easily.
The only thing we have left to do is buy a cable cover to cover the cables on the floor.
We built it in March, yes I know.. I was very slow in posting this project. I can confirm though that after using it for this long, we still adore it.
If you are looking for a way to hide the wires behind your TV, this DIY TV room divider is the perfect solution!
I hope you have enjoyed this project as much as I did.
P.S. If ever you like my wood wall sconces, we made them a few years ago.
Have a wonderful day!
Christine


Your instructions are so clear and specific!