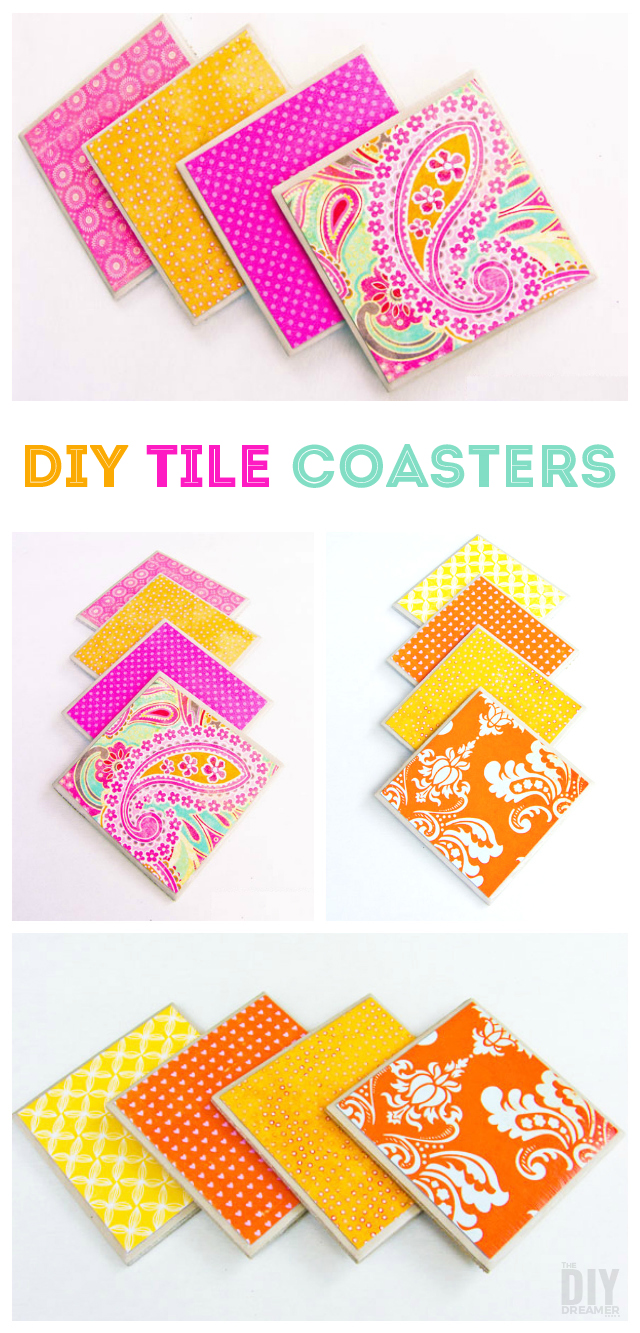
Beautiful DIY Tile Coasters!!!
Tile Coasters are very simple to make and don’t require many supplies to make.
I love coasters and yet I don’t own very many. Gabrielle and I sat down together and made these Tile Coasters last week:
This post also contains some affiliate links for your convenience. Click here to read my full disclosure policy.
How to make Tile Coasters
Supplies:
- Tiles (We used left over tiles from our kitchen counter.)
- Scrapbook paper
- Scissors
- ModPodge (We use Matte finish.)
- Paint brush
- Non-slip shelf liner
Instructions
Step 1: Take out some tiles and cut squares out of scrapbook paper. We made our squares a little smaller than the size of the tiles.
Step 2: Apply Mod Podge to the top of the tiles.
Step 3: Place your scrapbook paper square onto the Mod Podged tile.
Step 4: Apply Mod Podge on top of your scrapbook paper square and let it dry. (I think we are going to apply spray-on sealer on the next batch just to make double sure they are well sealed.)
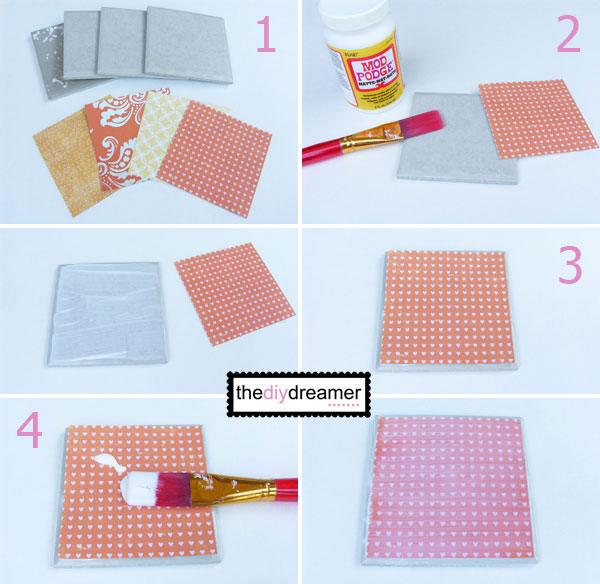
Step 5: Cut a square out of non-slip shelf liner.
Step 6: Apply Mod Podge on the back of your tile.
Step 7: Stick your non-slip shelf liner square onto the back of the tile.

And here they are, gorgeous tile coasters:
DIY Tile Coasters


We think they turned out pretty cute and they were SUPER EASY to make!
I need to buy more of that scrapbook paper, I absolutely love the colors and design.
What do you think of our coasters? Have you made coasters before?
Have a FABULOUS day!!


These look fantastic! I want some at my place. :) Thanks for the idea!
So cute! I guess the pink one is for me when I visit ;-) I just gave in and bought some that I liked because I absolutely didn’t have any more energy for another project, but needed some coasters.
Very clever! I think we will try this! I am visiting from Make it Yourself Monday link up and glad I did :)
I love the colours you have chosen! Look forward to trying this DIY.
Thanks for sharing!
Claire
This is such a fun project. I love the idea of the shelf liner on the back. You are so smart to include that.
These are so cute. I have a link party on Wednesdays, and I would love it if you would link this and any other posts. It is called Wednesdays Adorned From Above Link Party. It runs from Wednesday to Sundays.
http://www.adornedfromabove.com/
I hope to see you there. I am your newest follower, and I would love for your to follow me also. Have a great Day.
Debi Bolocofsky
Adorned From Above
http://www.adornedfromabove.com
I am going to make some!
I love love love the colors and patterns that you picked out… I made coasters like these once, but I used a damask print wrapping paper (they were for a themed bridal shower) and the results were terrible. Wrapping paper is just way too thin for the project! I really need to get around to trying another set, this time with a better paper like cardstock or something.
I would love it if you would link up at Martha Mondays, open now through Wednesday night!
http://www.watchoutmartha.net/2012/09/martha-mondays-link-up-party-features-93.html
~Amanda
http://www.watchoutmartha.net
Those turned out so cute!!! Definitely going to make some! Thanks for the super simple tutorial! (:
*Jourdan
twomillionmiles.wordpress.com
Love the bright colors!
Adorable!!!
I love the colors you picked. They look great!
VERY cute! I’ve made some of these but I’m loving your color choices. Now I feel the need to make some more in cutesy colors.
They turned out gorgeous! Love the colors. Megan
So bright and cheerful! Love them. I have to hold back and not make coasters all the time, there’s only so many drinks that need a home after all. Thanks for sharing at Etcetorize this week!
These are gorgeous! So colourful :)
Beautiful! I’d rather set a drink next to it than on top so I could stare at them. haha Great project :)
Oh these are great, and you’ve used my favorite colors, Love them
I LOVE the colors!
Thanks for the great pictures and making it look so easy.
Buffie
http://papercuts4u.blogspot.com/
Christine those are so lovely! My favorite are the orange and yellow ones…perfect for fall!
These look great! I love the bright colors you chose for them.
Those are all so pretty! I might have to have my girls do this for Christmas gifts this year! How fun would that be!!!
I LOVE THESE! They are so fun and bright. Might have to make these on a girls night!
Thanks for linking to Take-A-Look Tuesday over at Sugar Bee Crafts. You were featured today!
–Mandy, http://www.SugarBeeCrafts.com
HI! this is super cute! I’d love to do this at home. I’m also planning to suggest your project to my little sister so she can make her own for an economics exhibit. Thanks for this! http://misselayneousthings.blogspot.com
This comment has been removed by the author.
LOVED this. And it was SO simply described, I ran out and made 4 – using ModPodge I bought 10 years ago for a project I never did.
They turned out amazing, even for someone as crafty-challenged as I am, and I plan to buy some (new) Mod Podge to make more for friends.
Thanks!
I love these! Great idea! Projects like this inspire me to do out-of-the-box things for my site as well!
– Sam
DIYhuntress.blogspot.com
These are really pretty. Love the colored papers you chose, Christine. Thanks so much for sharing today!
nice coasters!
Great idea – I’m off to make some! Joining from Shine On Friday http://allthoseartsygirls.blogspot.com/
Great idea – I’m off to make some! Joining from Shine On Friday http://allthoseartsygirls.blogspot.com/
Great idea – I’m off to make some! Joining from Shine On Friday http://allthoseartsygirls.blogspot.com/
So bright and colorful! I am a follower of your blog on Facebook and would love if you could pop over to my new blog http://sarahsaturdiy.blogspot.com/ and share the blog love!
Lovin’ these coasters! The colors and patterns you chose are fabulous! Thanks for sharing at the Pomp Party! Pinning!
Love those pretty lil coasters – the colors are so pretty & happy. I definitely need to add this to my to do list!
These are beautiful! So bright and colorful!
Loving the bright cheerful colors!
TFS!
~Melissa
http://www.mywatermelonmoon.com
I love visitors! Come by and see me some time!
I’m trying to get 100 followers before the end of the month, hope you decide to join me too!
What a Fun Project… I’m Loving your Paisley Print one!
Dawn… The Bohemian
Awesome tutorial! I can’t wait to try making these coasters. Thanks so much for linking up last week to Creative Thursday. Can’t wait to see what you have for this week’s party! Have a great week.
Michelle
Those are so fun! Love the bright colors! Thanks for linking up at The Little Giggler! :)
Excellent color choices! So pretty and great tutorial as well :)
Thanks so much for sharing this at the Weekend Wonders link party! Hope to see you back on Thursday Have a great day :)
Hi Christine,
I just love these. I need to make some soon. Especially since I just redid my couch. Thank you so much for sharing with Wednesdays Adorned From Above Link Party last week. This weeks Link Party is opened at
http://www.adornedfromabove.com/2012/09/reeses-smore-brownies-and-wednesdays.html
from Wednesday until Sunday.
Hope to see you there.
Debi Bolocofsky
Adorned From Above
http://www.adornedfromabove.com
These are so pretty! I love the bright colors! Thank you so much for sharing at Thursday’s Temptation. I am featuring these at the link party!
http://twoyellowbirdsdecor.blogspot.com/2012/09/thursdays-temptation-33-fabulous.html
Jill
I know you must be tired of hearing this but you were featured AGAIN! GO grab a button
Love your coasters they turned out great! Hope you have a great week!,
-Kayla :)
I’m stopping by from the marvelous Monday party (I get to co host this week so be sure to stop by my blog and say “hi” if you haven’t done so yet!)These are so cute! I am absolutely going to pin this and revisit this post again in the future!
http://www.sewingourlifetogether.blogspot.com
I Love the orange & yellow coasters! What a great project … Quick, Simple, Cheap … My Favorite :)
These are beautiful! Never seen them using the shelf liner before- great idea!
Those look great! I’m just stopping in from this gal cooks.
You know, no other coaster tutorial I’ve seen has mentioned anything about applying something to the back to make it “non-slippery.” I love how your tiles turned out, but I’m always impressed by repurposing an item!
I love these. The vibrant colors of the paper are awesome. I would love it if you would link up to my three co-host party going on right now. Tip toe thru Tuesday. I hope to see you there.
http://christyscuties.blogspot.com/2012/09/tip-toe-thru-tuesday-link-party.html
They are beautiful!
Love for you to share it at my linky party if you get a chance :)
http://www.jaqsstudio.com/2012/09/made-by-me-49-linky-party-and-features.html
These are beautiful!! I would love for you to link up to Tasty Thursdays on my blog The Mandatory Mooch. http://www.mandatorymooch.blogspot.com/2012/09/tasty-thursdays-9.html
Thanks, Nichi
Great Project. My daughter and I are going to make a set as a Christmas gift to Grandma. Thanks for the inspiration. ;o)
Fantastic…
Beautiful! I love your paper choices.
I love these! How does the Modge Podge hold up to sweating glasses? Can’t wait to give it a try.
Love the idea of using shelf liner instead of the usual felt squares! These would make great gifts.
I’ll be featuring your project at tonight’s Make it Great party. I hope you’ll stop by to grab a featured button from the sidebar and link up again!
These are adorable and functional! Thanks for sharing. I would love if you would share these (and some of your other projects) over at my link party going on right now:
http://sewingbarefoot.blogspot.com/2012/09/the-weekly-creative-1.html.
Have a nice day!
Shannon
I’ve been meaning to try these! You guys did a great job! Love the colors you choose! Thanks so much for linkin up :) Hope to see you again this Sunday! XOXO
The orange and yellow are so colorful and would be great all-year round! thanks for sharing this with us. this fab project was featured at this week’s crafty saturday party! ^^)
Hugs,
Lelanie
Yes! Finally! Your instructions are easy, and these make great hostess gifts on the fly. I plan on making several batches for grab-n-go gits.
Thanks.
Diana
http://traditionalurbanite.blogspot.com
To help protect your furniture use either those felt circle pads (too expensive & don’t last for my taste)or use any color of felt material you like . Just cut & trim it a little) it to match the tile and glue it on the bottom.
Love the colors! Also like what you did with the bottoms to help them “stick”.
Super cute idea! come link up to centerpiece Wednesday on my blog and share your post with us. http://thestylesisters.blogspot.com/2013/04/centerpiece-wednesday.html
Karin
Love the bright colors!! Super cute!! :)
Where do you get the tiles?
Beautiful. How long after we make tiles you can safely use? And can a hot pot be put on it?
Thanks MJ
I don’t have any tiles.What are the best tiles to use?Are bathroom tiles used for walls the kind u are talking about?
How do you keep your paper from wrinkling?
I love these. I was wonder can you put a hot or cold beverage o this? Also if the cold beverage sweats will the paper get messed up?
I made some of these. And sealed with varnish .but it still seemed to stick to one another even though I left to dry for 2weeks. When puting them ontop of each other it lifted the paper. What went wrong.
Love it! Just bought tissue paper to try on my tiles. Love your idea though… I can use up much of my scrap paper this way. Thanks for the tip!
I have made a few sets theselast few