Aztec Clay Pendant – Easy Clay Jewelry Tutorial
This post is brought to you by Polyform Products. Featuring the NEW Sculpey Soufflé Clay. As always, all opinions are 100% my own.


Have you heard of Sculpey’s NEW Souffle Clay? It’s a lightweight clay that is PERFECT for jewelry making. I made a bunch of jewelry with it and I can’t get over how light the clay is. It comes in a bunch of awesome colors and BONUS you can mix them together to create custom colors too!
What do you think of the Aztec Clay Pendants I made? They are super easy to make and such a fun design. Want to make some too? This post contains some affiliate links for your convenience. Click here to read my full disclosure policy.

Aztec Clay Pendant
Supplies:
– Sculpey Soufflé Clay
Sculpey Essential Tool Kit:
– Clay roller
– Clay slicer (I used the Super Slicer with handles)
– Clay knife
– Needle end pointer
– Wax paper
– Jump rings
– Chain
– Spring ring clasp
– Pliers
– Paper
– Pencil
– Scissors
– Ruler
Instructions:
Step 1: Draw yourself an Aztec template. Copy your template onto another piece of paper so that you have two templates. Cut out the details out of one of your templates.

Step 2: Take out the Soufflé clay you are planning to use for your project.

Step 3: Take out the clay you need for the main part of the pendant and place it on a piece of wax paper. Roll it into a ball and use the clay roller to roll it to your desired thickness (mine were a little less than ¼in).
 Step 4: Place the template over the clay. Use the clay slicer and clay knife to remove the excess clay.
 Step 5: (Time to work on the details) Repeat Step 3 with the other two Soufflé clay.

Step 6: Place both detailed pieces onto your main piece. Use the clay slicer to remove any excess clay.
 Step 7: Use the Needle End Pointer to make two holes in your piece of jewelry.

Step 8: Place your jewelry on an oven-proof glass or metal surface. Bake it in the oven at 275 degrees F for about 30 minutes per ¼ in.
Step 9: Once your jewelry has cooled off, use the pliers to add jump rings, chain and spring clasp onto it. (If you want to see how to attach the jump rings and chain, you can check this out: $3 DIY Charm Necklace.)

Step 10: ENJOY!

P.S. Feel free to make a bunch more! That’s what I did!


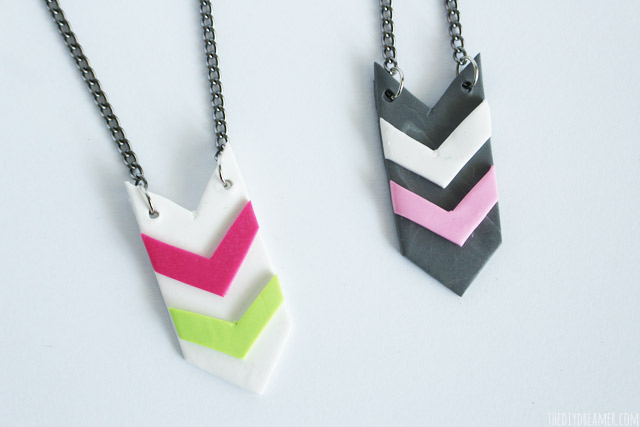

And what do you think of the pendants? Aren’t they great?!
I absolutely love the feel of them too! The Soufflé Clay makes them feel suede like, it’s wonderful.
Check out these fabulous projects:
Get social with Polyform:
Facebook: Polyform Products ~ Twitter: @SculpeyPolyform ~ Pinterest: Sculpey ~ Instagram: @Sculpey_Polyform
Hope you’re having a fabulous day and don’t forget to go make some jewelry! :)

P.S. I’ll be linking to these Parties.


I haven’t tried the Soufflé Clay but, have used their other kinds. Love working with clay. I need to try this soon! Pinning for later. Thanks for the tutorial.
i love the Sculpey clay tools, especially that slicer. It makes cutting straight lines so easy. Careful though, it’s super sharp and I ended up slicing into my finger when I was cleaning it. Oops!
Oh my gosh! I super duper LOVES these necklaces, Christine!!! Can you mail me one, please? :)
LOVE these! :)
This is lovely! I really like the chevron pattern!
I love your necklace! Good result and quite easy to make. Thanks for the tutorial.
What a cool project. This looks like something my 17 year old daughter would like to do this summer. Thanks for sharing the tutorial with me.
Love! I’ve been totally digging the tribal trend. I think this pattern would make cute earrings too!
Oh these are cute-and such pretty colors!
I absolutely LOVE what you created!
Hi Christine! I just wanted to let you know that I LOVE your Aztec Clay Pendants, and I’m featuring you as one of my Rockstars this week from Creativity Unleashed!
As a Rockstar you’re in the running for this week’s MEGA Rockstar! Grab your friends and come vote at http://www.theboldabode.com/2014/06/creativity-unleashed-rockstars-week-24.html
The MEGA Rockstar gets loads of love including:
1. Shout outs on all my social media houses.
2. A bucket full of Pins to my biggest group boards
3. A big sidebar ad proclaiming them the MEGA Rockstar of the week
4. And a feature in my weekly newsletter!
Congratulations and Good Luck!!!
These are so adorable and look like something I could actually make! Thanks so much for sharing at The Makers! Pinned :)
These look great, really unique looking and not too hard to make by the looks of it!
These are so beautiful! Such bright and fun pops of color! You did a great job! We would love it if you linked up with our party this week!
Pinned ya girl! I love these so much. I see some in the linky I must try too. I do a lot of clay jewelry in my shop. I am also featuring you tomorrow at the Bacon Time linky. :)Hugs
Thanks for linking to Create Link Inspire at The Crafty Blog Stalker. You will be featured when the post goes live later tonight, and you have been pinned! Thank you for sharing.
–Katie, TheCraftyBlogStalker.com
These are adorable! Looks like they would be nice and easy to make too! Thanks for sharing at our Fun in the Sun party – pinned! :) Happy Summer!
These are amazing! I love the colors you used! These are being featured at this week’s link party!
Thanks for linking up to Tip Me Tuesday linky party. {knuckle bumps}