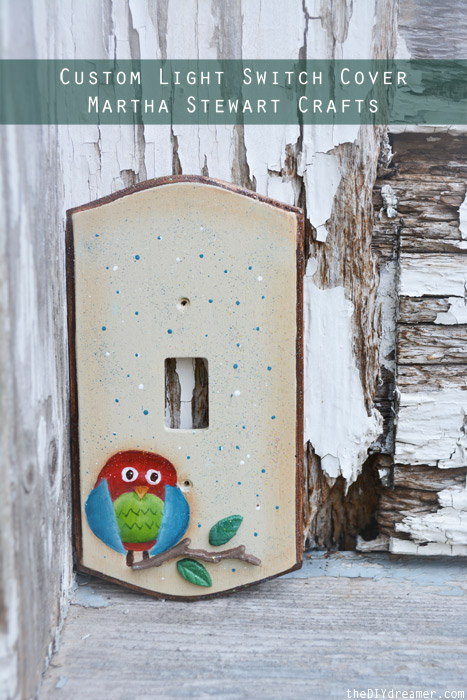
Custom Light Switch Cover
Custom Light Switch Cover ~ Each time a new baby is born in our family, my Mom makes the baby a personalized light switch cover and a wooden plaque with a painted angel on it. When my Mom saw the supplies from June’s #12MonthsofMartha she asked right away if she could try out the Crafter’s Clay Nature Starter Kit. She knew it would be perfect for the light switch cover she wanted to make for my brand new nephew Liam. Liam’s bedroom is decorated with owls, so the nature clay kit would be perfect!
![]()
This post contains some affiliate links for your convenience. Click here to read my full disclosure policy.
How to make a custom light switch cover.
Supplies:
Wooden light switch wall plate
Paint & Paint Brushes
Martha Stewart Crafts – Crafter’s Clay Nature Starter Kit
Craft Glue (I used the one from Martha Stewart Crafts)
Instructions:
Step 1: Paint the desired design onto the wooden wall plate. Step 2: Take everything out from the Crafter’s Clay box. Step 3: You’ll need a ball of brown clay and a smaller ball of white clay. (You can use the brown as is, but my Mom desired to have a lighter brown). Step 4: Blend together both balls of clay until they are well blended. Step 5: Roll the clay in a long strip and press it down into the branch mold. Step 6: Make small balls of white, yellow and blue clay. Step 7: Blend together the three colors to get the desired shade of green. Step 8: Press the green clay into the leaf molds. Step 9: Allow the clay to dry for 24 hours before taking them out of the mold. Step 10: Use craft glue to glue the clay pieces onto the wall plate. Once dry, you can add some more paint to your light switch plate until you have the desired look.

Voilà, the end result:

![]()

![]()

![]()
Isn’t it ADORABLE?? I’m sure it’s going to look great in Liam’s bedroom!
Hope you are having a BEAUTIFUL day!

P.S. I’ll be linking to these Parties.
Disclosure: Martha Stewart Crafts sent me supplies in order to create this project. The opinions in this post are 100% my own.


How cute!! I used to do these with Stampin’ Up rubber stamps. The owl is adorable!!
I love the owl, it’s very cute Christine!!! :-) love how the leafs are done too!
& the name Liam is so cute!
That’s so cute! You have painting skills!
Christine ~ this is so darn cute!!! Isn’t that clay awesome!
Love this light switch cover!!!
Super cute, Christine! Thanks for linking this to the par-tay! Stumbled and tweet! xo
Hi Christine ,I love Custom light Switch Cover,thank you sooooooooo much ;) :)
What a cute idea!!! I love little painted bird on the clay branch. This is adding so much charm:)
I am obsessed with owls and you gave so much inspiration ;) well done!
How cute! Thank you for joining Home Sweet Home!
Sherry
So cute, perfect for a children’s or even craft room.
Christine – So much fun to do and perfect for a kids room.
That’s adorable, Christine! Gosh I miss working on projects and your linky parties… still adjusting to having 2 kids now hehe. Need to work on something soon!