House Number Sign with Doorbell and Box
Learn how to build a house number sign with doorbell and box. This house number plaque is the perfect way to display your house number, it even has a space to add a wireless doorbell, and a box to use for mail or to decorate each season. Using floating house numbers adds an extra touch of pretty!
Installing a wireless doorbell
We changed our front door this summer and I kept putting off installing our wireless doorbell to the new door frame. I didn’t want to damage the frame with screws or use sticky tape to hold it into place.
I placed the doorbell next to our house number sign to see if it would look cute next to it, if it did I would install it into the brick wall. I didn’t like the way it looked.
Then the idea struck me that I could build a house number sign and install the doorbell on it. While I’m at it, include a box that can be used as a letterbox or to decorate with greenery.

This post contains some affiliate links for your convenience. Click here to read my full disclosure policy.
How to build a House Number Sign with a doorbell and a box
Supplies:
- Wood
- Biscuits
- Glue
- Sandpaper
- Varnish or Stain
- Floating House Numbers
- Wireless doorbell with portable system
- D-ring hangers 2x Large
Tools:
- Miter saw
- Biscuit joiner (optional)
- Clamps
- Orbital sander
- Brad nailer
- Wood punch (optional)
- Cutting pliers (optional)
Instructions:
Step 1: Using a miter saw cut a wood board into the following sizes:
- 2x 12″ x 7″ (back of sign)
- 2x 3″ x 4 1/4″ (sides)
- 1x 10 1/8″ x 5″ (front)
- 1x 10 1/8″ x 3″ (bottom)

Step 2: Position the two 12″ x 7″ above one other.

Use a biscuit joiner to attach the two 12″ x 7″ pieces together, if you have one, by making biscuit holes into both pieces (two holes on the bottom of one piece and two at the top of the other piece). We didn’t need to make markings because we aligned the biscuit joiner on each end.
Please note: If you do not own a biscuit joiner, you can simply glue the two pieces together and clamp together until the glue dries.


Put glue into the holes and insert biscuits into one of the pieces.


Add more glue and assemble both pieces together.


Use clamps to keep them tight.

Remove any glue that is leaking out. Allow to dry.

Step 3: Use an orbital sander to make sure the joint between the two pieces is nice and smooth.

While you have the orbital sander out, feel free to sand the other pieces if they need some sanding.
Step 4: To make the box that goes in the front of the house number sign:
Glue the bottom piece (10 1/8″ x 3″) onto the two sides (2x 3″ x 4 1/4″).


Then fasten them together using a brad nailer.

Don’t forget to remove the extra glue.

Attach the front piece using glue and a brad nailer.


If you see any glue, wipe it off.

Front view of the box.

Inside view of the box.

Step 5: To attach the box unto the sign, align it to the corner of your choice. Use glue and a brad nailer to attach them together.

To make the process easier, we made a little stack of wood that was the same height as the box so that the back piece would lay flat.

Apply glue.


Fasten the back onto the box with nails.

Use a measuring tape to make sure to fasten the back on the box.


Front view of the box attached.

Step 6: Pre-drill all the holes that you will need in order to attach the house numbers, the wireless doorbell, and the d-ring hooks.
The house number packaging comes with a handy template to position the numbers. We placed our numbers 1.5″ from the top and side.


A little tip, once positioned to our liking, we apply pressure on the numbers which leaves little indents of where we should drill.


We also puncture the wood in the middle of the dents with a wood punch.


The mounting screws that came with out house numbers were to long for the thickness of our sign.

We used cutting pliers to cut them down so that they would not stick out of the back of our sign.


We like to wrap electrical tape on our drill bit to mark off how deep to drill.


We used a wood punch to mark where to place the screws for the wireless doorbell mounting plate.


Don’t forget to remove the screws before going to the next step.
Step 7: Time to weatherproof your house number sign with varnish or stain. I like using semi-gloss exterior Varathane spray.
Apply as many coats as recommended as per the instructions on the product you are using.

Allow to dry as per the recommended amount of time.

Step 8: Add the house numbers onto the house number plaque using the instructions from the manufacturer.


Step 9: Attach the wireless doorbell on the plaque.


View of the sign with everything attached to the front.

Step 10: Add two d-ring hangers on the back of the house number sign.


Hang up the sign and enjoy!


The finish product measure 12 inches wide by 14 inches high.
Two Sided House Number Sign with floating numbers
We also made a two sided house number sign to hang on our lamp post.

Here’s the side view:

Oh! You can see our 3D Barn quilt in the background! I took this photo this summer! Right now it has been replaced with our Outdoor Christmas Countdown Marquee Sign!
Same thing for the two sided house number sign, it has been replaced with our Farm Fresh Christmas Trees sign.
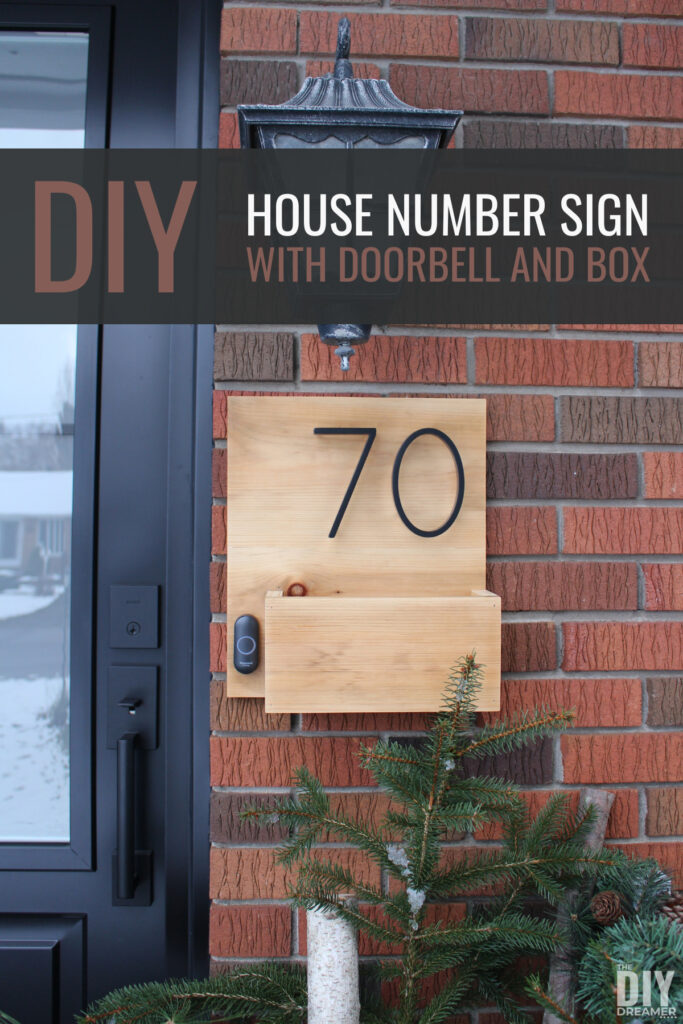
House Number Sign with floating numbers, wireless doorbell, and box
Here’s our house number sign hanging on the front of our house. I simply love how it turned out!

Eventually I will put greenery inside the box. We made the box big enough to hold three small mason jars. I’m thinking a smaller version of these Christmas mason jars could be really cute!

I sure hope we have inspired you to create your own house number sign!
I think I’m going to make a second one to put next to our DIY screen door.
Have a wonderful day!


This is such a fantastic idea, and it looks so nice! I wandered over here from The Creative Muster link party and you have so many great posts. I have subscribed to your blog :) Have a fantastic day!