Outdoor Christmas Countdown Marquee Sign
What better way to count the days until Christmas than with a Giant Outdoor Christmas Countdown Marquee Sign!
Yesterday I shared a sneak peek to this FABULOUS DIY Christmas Project! I just couldn’t keep it to myself any longer. It’s one of those ”I can’t wait to share it!” kinda of projects.
So you can imagine how excited I am to share the tutorial with you. SO EXCITED!
Ready to check out how we put this Outdoor Christmas Countdown Marquee Sign together? Awesome, let’s get to it!
Since making this Outdoor Christmas Countdown Marquee Sign, I have made lots more DIY Christmas Countdowns. So many that I now have a collection of them!
This post also contains some affiliate links for your convenience. Click here to read my full disclosure policy.
Outdoor Christmas Countdown Marquee Sign
Wood:
- Background: Piece of Plywood 1/2″ thick 26″ x 36″
- Plaques for Numbers: 7 pieces of Plywood 1/2″ thick 8″ x 11″
- Frame: Wood 1″ 2x 27″ x 3.5″ and 2x 30″ x 3.5″
Supplies:
Lettering that I printed and blew up with my photocopier.
Fonts we used along with size:
- Christmas: Mission Script – 17 1/4″ wide
- Days: Mission Script – 5 1/2″ wide
- Countdown: Franchise – 17 1/4″ wide
- Numbers 0 to 9: Verdana – 7 3/4″ high
Paint colors:
- Frame and Plaques: BEHR Black Pearl – T16-01
- Background and Numbers: BEHR Bungalow Beige – HDC-AC-10
- Christmas: BEHR Forbidden Red – PPU1-10
- Countdown and Days: BEHR Portsmouth Olive – HDC-CL-20
- Graphite Paper – Black for background and White for plaques.
- Paint brushes
- Hooks (4) for the plaques
- Screws
- Lights – We used lights that we bought at Target last year (before they closed here in Canada). It’s a set of 25 bulbs that screw on and off. We removed one the bulbs so that we would have an even 24 lights around the sign.
- Fastening System to attach the sign to the wall. We used hooks that can handle 25 lbs.
- Pencil
- Clamps
- Ruler and/or tape measure
- Staples
Optional if you have a plate joiner:
- Glue
- Biscuits
Tools:
– Circular Saw
– Palm Sander
– Drill and/or drill press
– Plate joiner (optional)
Instructions:
Step 1: We started off by cutting all the pieces of wood we needed for the sign: background, frame, and plaques. We then proceeded to sand all the pieces until they were nice and smooth.

Step 2: Once all the pieces were ready, we used our plate joiner along with glue, biscuits, and clamps to make the frame.
Our DIY Screen Door post explains quite well how to make sure the frame is nice and square.

Step 3: Time to paint the background, frame, and plaques.
For the frame and plaques, I used the same staining technique that I used on the Arrow Wall Decor.

Step 4: Once the pieces were painted, I placed the printouts onto the background in order to see how everything was going to look.

Step 5: Time to trace all the numbers onto the 7 plaques.
I traced numbers on the front and back of the plaques by taping the numbers onto the plaques and placing white graphite paper between the numbers and plaques.
I then proceeded by tracing the outline of the numbers with a pencil, by doing so the graphite paper transferred the outline onto the plaques.
Here are the number combinations I did: 1-2, 1-2, 3-4, 5-6, 7-8, 9-3, 0
Once all the numbers were traced, we painted them. When I say ”we” I mean my sister Emily! Thanks Em!

Step 6: Using the same tracing technique, I traced Christmas, Countdown, and Days onto the background using black graphite paper.

Step 7: We attached the frame to the background by using screws.
Yes, we could have used glue and nails, however I opted for screws in case that some day we need to change the frame to adapt to new lighting.

Step 8: We used the drill press to drill two holes per plaque.
Once all the holes were drilled, we placed two plaques onto the background and used an awl to make markings onto the background where we were to screw on hooks.
The hooks we picked out did not have big enough openings, so we used pliers to pry them open a little more.

More steps will continue after this little break. I figured that perhaps some of you would like to see the Days Until Christmas Sign without lights, so we went ahead and placed two numbers on it and attached it to the wall so that you can see what it looks like without lights.


I think it looks quite fabulous even without lights. However the lights do add the perfect finishing touch. :) Ok, so let’s proceed with the installation of the lights.
Step 9: We made 24 markings on the frame and proceeded to drill holes using a bit just a tad bit bigger than the width of the lights.

Step 10: We inserted the light strand and our little Emanuelle screwed on each light bulb. We also stapled the strands onto the back of the sign.


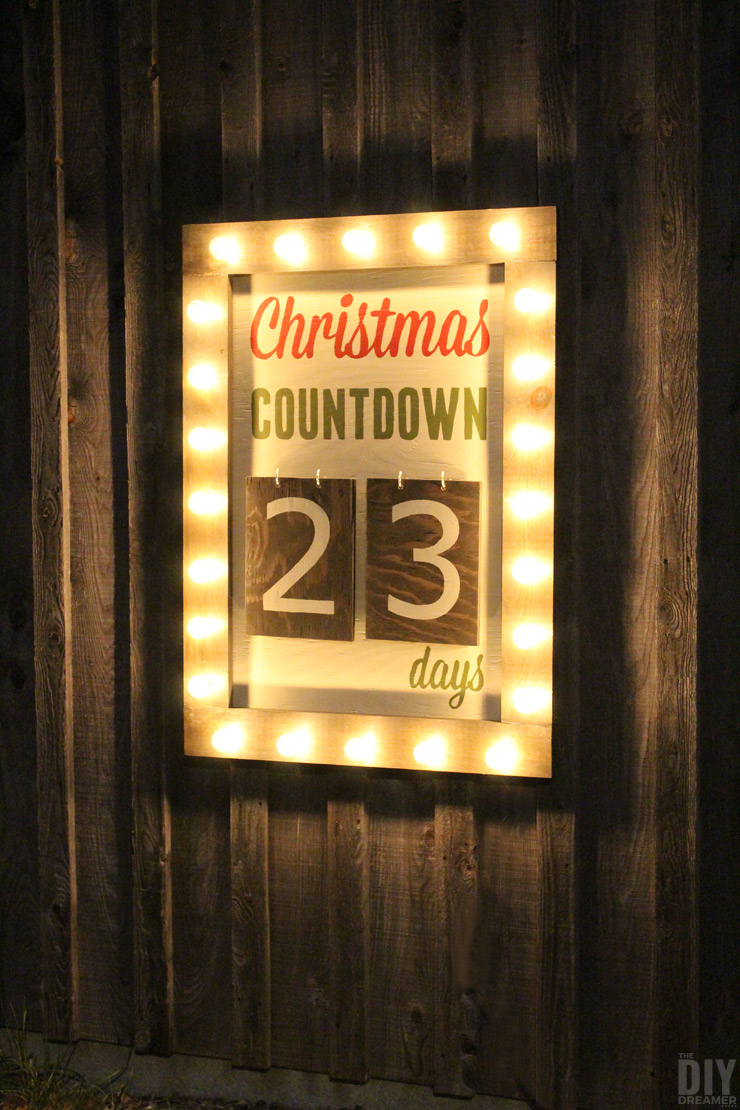
Ready to see the Outdoor Christmas Countdown Marquee Sign?
I hope so!!
Here it is when it’s not lit:


And here is the beautiful Christmas Countdown Sign all lit up:

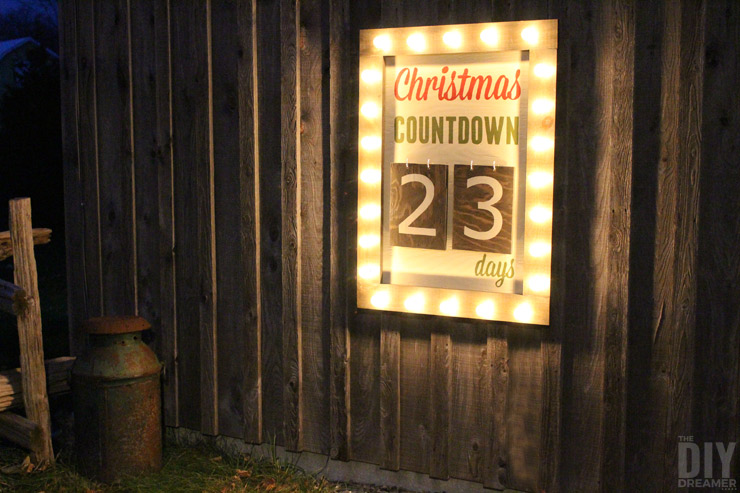


Isn’t it absolutely WONDERFUL?!
You better say yes! I’m so HAPPY with it! It turned out just like I wanted.
By using a light background and light colors on the plaques, the lights make the lettering and numbers show up crystal clear. Perfect outdoor Christmas sign!
What do you think? Please tell me you love it as much as I do?
If you love it too, please feel free to PIN and/or Share with your friends. :)
Find more ideas here: Christmas Projects.

P.S. Thanks Sébastien, Emily, Mom, Dad, and Ema for helping me put this super cool Christmas project together!


Love it! I want one!
Let’s get more lights and get to work on one for you! :)
My husband is going to LOVE this! And I happen to have bought a few bought a few of those same lights before Target closed too! Thanks for sharing this awesome project!
Yay!!! Let me know if you make one! I’d love to see it!
This sign is so cute! You did an awesome job!
Paige
http://thehappyflammily.com
Thanks so much Paige!
WOW, just wow… I love it!
Thanks so much Margarita! I’m so happy you like it!
Were the lights on a strand, like outdoor Christmas lights?
Yes, outdoor Christmas lights on a strand with bulbs that screw on and off. :)
Fantastic idea! And you tutorial makes it so easy looking!. Just need the patience to paint all those numbers.
And it looks gorgeous against the board and batten!
This is a fantastic project, Christine. I bet the kids will be excited to start the countdown today. Happy December!
WOW!!! By far, one of the COOLEST diy’s I’ve ever seen!! I can imagine using this for New Year’s counting down by the hour!
Oh what a great idea for a countdown – and it looks beautiful lit up at night!!
This is such an awesome idea. I cannot wait to make one for my house.
OMG I am totally in love with this. I wish I had a barn or some awesome space outside to put this. I am going to have to do some serious thinking on where to put this because we NEED it!! What a brilliant idea!!
Thanks for sharing it at Totally Terrific Tuesday!
I always love your goodies you link up!!
Jess
Pinned and shared!
What a neat idea! I love it! You did a wonderful job on it, it looks Great! Thanks for sharing your tutorial, Pinning and sharing!
Hi Christine, thank you for joining our blog link party. Love, love your creativity! Have a very Merry Christmas ~ HomeGoods
That is so cute! Thanks for sharing at Home Sweet Home!
I looooove it Christine! What a fantastic countdown sign. I loved it before the lights and loved it even more after ;) Thanks so much for linking it up to the Inspiration Galore Project Party. Pinned and Shared.
Your lovely outside sign post is my featured for this week “Inspiration Galore Project Pty. at fabifabu.com. Thank you for sharing, hope to see you next week.
This DIY is absolutely fantastic! Loving how simple it is to make. Will have to do this soon. Stopping by from Wednesday party time.
Hello, I absolutely adore this Marquee countdown sign. I was wondering where did you plug in the lights? As far as your pictures show you don’t plug it in anywhere. And what kind of lights and size are they? Thank you.
I’m so happy you like it! You can’t see the extension cord in the photos because I placed the marquee countdown sign over a plug when I hung it on the garage. You can see the cord here https://www.instagram.com/p/BqnrLOllTlh/ where I hung it in the front of my house.
For the lights, I used a set of 25 outdoor lights (that unscrew) that I bought at Target. You can use any size outdoor lights as long as you can unscrew the lightbulbs.
@Christine @ theDIYdreamer, Thank you for your prompt response. I have one more question the paint you used is it interior or exterior paint? And did you just purchase the sample size?