How to Paint a Table and Stain a Tabletop
Ever wondered how to paint a table? How about we learn how to paint a table together, specifically a dining table? Learn how to paint a table and how to stain a tabletop.

How to give a dining table a makeover
Before we start the tutorial, how about I show you the table I had to work with. It’s a solid maple table that belonged to my great uncle.

I just loved how much potential it had. It also had two leaves that I could add to it to make it a perfect table for 6 or even 8 people.
It came with 6 chairs like these 4.

Now time to start working on the table!
This post is sponsored by Fusion Mineral Paint. All opinions expressed in my post are my own.
This post also contains some affiliate links for your convenience. Click here to read my full disclosure policy.
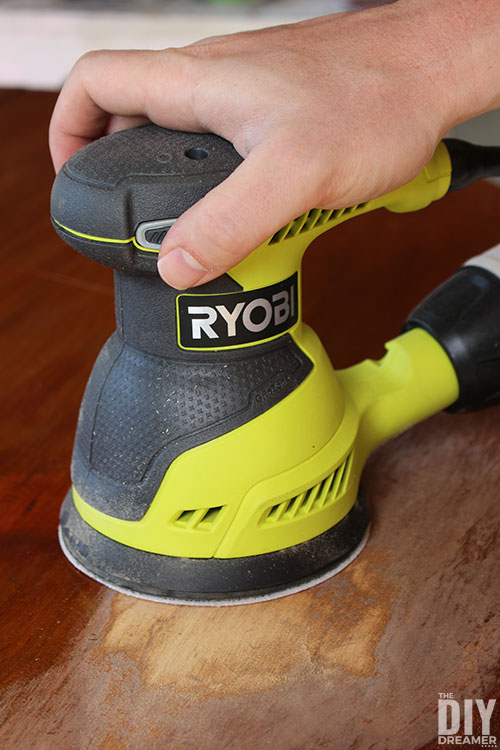
How to sand a dining table top
The first thing we did with the table was sand down the tabletop back to bare wood.
The table top had a weird spot on it, I’m assuming my uncle dropped something on it at one point that damaged the finish.
Please note that we sanded down the top to bare wood because we were planning to stain the top and not paint it.
We used our orbital sander with 80 grit paper to remove the most of the varnish possible.
We switched to 120 grit paper to smooth it out. We finished with hand sanding with 200 grit paper.
I was so happy to see such a beautiful grainy wood under all that old varnish.
And absolutely thrilled that the spot that was on the top did not go deep into the wood. Yay!

How to prep a table to paint
The most important thing to do before starting to paint a table and to paint any surface is to clean it first!
We used Fusion Mineral Paint’s TSP to clean the entire bottom of the table. Fusion TSP is a water-based biodegradable degreaser.
It removes oil, grease, fingerprints, stains, and other contaminants. By removing all of that, it improves the adhesion of the paint.

Fusion TSP is a concentrate, which means water must be added to it. T
o make the application easier and to allow us to re-use what we didn’t use, we opted to mix the Fusion TSP and water inside a spray bottle. We used the recommended TSP to water ratio indicated on the bottle.

We sprayed the mixed solution on sections of the table and wiped it with shop towels.
We continued this process until we had cleaned the entire table. A very quick process that is crucial for a good paint job.


Next we did a little sanding with 220 grit paper to scuff the surface. This gives the paint extra grip on the surface.

We made sure to wipe everything we sanded with shop towels, to make sure no dust was left.
We also put painters tape under the tabletop where there could be a possibility of us accidentally putting paint on it.
You’ll notice that we did not sand under the table top. We opted to leave that as is because the table had markings underneath it stating where it was made, etc…

Voilà, time to paint!
How to paint a table with Fusion Mineral Paint
Before we jump into painting, I should probably tell you which Fusion Mineral Paint color we went with.
We chose Fusion Mineral Paint Bedford, which is a mid-range neutral grey with a strong yellow tone. It’s an absolutely perfect color.

This video was really helpful to watch before we started painting. It demonstrates how to achieve the perfect brushstroke-free finish, it’s really worth watching.
With our beautiful Fusion Mineral paint and Staalmeester Oval Brush (#45) in hand, we slowly dipped the brush into the paint. Following the recommendations from the above video, making sure not to put too much paint on the brush.

We started to paint. We just loved how easily the paint applied to the surface, and the color just made us so happy!


When we had applied the first coat, we allowed it to dry for 4 hours before applying the second coat.

Isn’t the dining table coming along beautifully? How I love the color!!
How to stain a table top
To stain the dining table top, we chose Homestead House Stain & Finishing Oil All in One Wood Finish in Cappuccino.

This particular stain is eco-friendly, has a low odor, and exceptionally durable in high traffic areas like tabletops, kitchen cabinets, and floors. Perfect for my dining table top!
As I previously mentioned, the table is made of maple which is a hardwood. Prior to applying the stain, we had a few steps we needed to do to prep the surface.
We started off by wetting the entire surface using a shop towel. This makes the wood grain lift a little, which allows the stain to penetrate better into the wood.
We let the surface dry for 2 hours.

After the 2 hours were up, we hand sanded the table top with 220 grit sandpaper until it was completely smooth.

We made sure to remove all the dust from the surface using a shop towel.
Time to start staining! But wait, we found this video on staining a dining table super useful! It was really great to see the process to visualize how to apply it correctly.
With latex gloves on, my wide foam brush in hand, it was time to start staining the table top!

We worked in sections and made sure to not let the stain sit longer than 10 minutes.
As soon as the stain had been on for 10 minutes, we used shop towels to remove the extra stain from the surface.
Oh goodness, how every wipe brought joy to us. It left behind it a beautifully colored grain.


Once the entire surface had been stained and all the extra stain was removed, we let the surface dry.
It took about 10 hours to dry.
The edge of the table took longer to dry, probably because we applied a thicker coat there and didn’t wipe it as much. We wanted the edge to be a little darker.

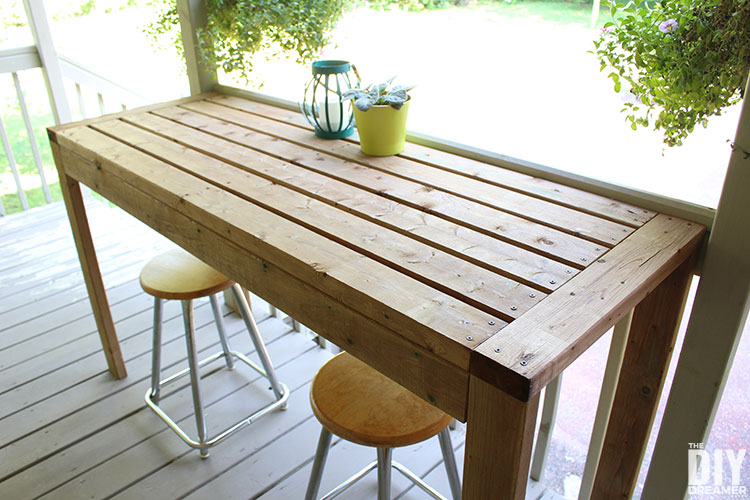
Doesn’t the table top look AMAZING? We are definitely not giving it a second coat, we love the color as is. We just couldn’t stop looking at it, the color, the grain… perfection!
Dining Table Makeover Result
We are completely in love with our dining table! We love how the Bedford color and the stain compliment each other! They are a perfect match!

What color should we paint the chairs
The initial plan was to paint the chairs that came with the dining table in Bedford (same color as the base of the table). We aren’t sure anymore.
We kind of like the dark color of our old chairs with the table.

What do you think? Should we paint the chairs Bedford like the base or go with a darker color similar to our current black chairs?
I’m sorta of leaning to keeping my old black chairs as my everyday chairs and painting the chairs that came with the dining table dark as well.
We could use those chairs when we extend the table when we have guests. The chairs won’t all be the same, but at least they will be the same color.
Painting with Fusion Mineral Paint
We truly enjoyed painting with Fusion Mineral Paint. So much so that my husband has been talking about painting our kitchen cabinets with it. Oh, how I would love to update my kitchen! Sounds like a fun project!
UPDATE: We did it! We painted our kitchen cabinets!! We also painted our tile backsplash!
We loved that Fusion Mineral Paint didn’t require too much prep and that the application was easy and beautiful!
Seriously, it was so easy to use that I have so many potential makeovers in my head.
If you are interested in seeing more projects painted with Fusion Mineral Paint, they have a great Facebook group full of inspiration and help called Paint It Beautiful. It’s a wonderful painting community full of great resources to tackle any painting project.
I hope we have inspired you to paint something and give it a new life!
And please do let me know what you think of the dining table and which color you think we should paint the chairs!
Thanks so much!!
Christine


How stunning! Great job! I never in a million years anticipated those results! WOW! If the chairs would stain like the tabletop, I would go that route. However, they’d look cute and cottage-y (totally a word) in the lighter color of the table legs. I’m staying tuned!
Oh! I love the idea of staining them Natalie! I wonder how long it would take to strip the old varnish from the chairs. That’s what’s nice with painting with Fusion Mineral Paint, I wouldn’t have to strip the varnish off before painting, but if I stain I will need to do that. But goodness would those chairs look nice stained! Thanks for giving me a 3rd option for the chairs. hehe
Looks great. To get in the little crevices did you paint around the leg to get in the cracks or continue with the up and down strokes?
Hi Tiffany!! We painted around the legs to get in the cracks and then used up and down strokes. Hope this helps! :)
This turned out really well, those chairs are worth every minute you spent on the table. I redid our table a couple of years ago, and it certainly is a workout. Great makeover.
This looks really fabulous. Well done. How much paint did you use for the project?
Did you put any sort of top coat on after the stain? I’ve been looking for an exact tutorial like this! Thank you!
Hi Kelsey! No, I did not apply a top coat over the stain and it still looks wonderful. I’m happy my tutorial is what you have been looking for! :)
I have a star wood table top. Should I try to put stain on with the grain? Seems pretty hard to do.
Why don’t you consider leaving the seat part natural wood and paint the chair legs and back support the Grey colour. Best of both worlds. Love the tutorial. I’m about to do my mom’s antique table too. Will be doing my chairs like this.
Did the table have a “veneer” or laminate layer on top when you started sanding? I have one I want to redo, but it appears to have that plastic coating that tables have for protection. Can I sand that off?