How to Make a Yarn Wall Hanging
Learn how to make a yarn wall hanging with this step by step tutorial made by my 10 year old daughter.

Yes, you read correctly! My daughter made this yarn wall hanging!
Are you surprised?
Well, you shouldn’t be. hehe She made a window macrame valance a few months ago. Which is absolutely stunning.
She has promised to make me another window macrame valance for my other kitchen window. The rope is hanging and just waiting for her to work her magic.
She is very proud of her macrame valance, but was quite over the moon when I asked her to make a yarn wall hanging for our kitchen.
I’m pretty sure she had already figured out that it would be a lot quicker to make than macrame.
Wondering why I asked her to make one?
Creative Wall Challenge
This month’s At Home DIY Challenge: Creative Wall
I’m participating in a year long DIY challenge with a fabulous group of DIY bloggers. Every month we have a new challenge. Last month’s challenge was $20 DIY Decor, my project was a DIY multipurpose side table. At the bottom of this post you’ll find a collection of Creative Wall Projects.
And that’s why I asked Emanuelle to make me a yarn wall hanging! hehe
P.S. She also made a Rainbow Yarn Wall Hanging with her sister. You see it at the bottom of this post.
This post also contains some affiliate links for your convenience. Click here to read my full disclosure policy.
How to Make a Yarn Wall Hanging
Supplies:
- Yarn – 1x ball of colored yarn.
- Yarn – 1x ball of beige yarn. (I used Cozy Wool from Loops and Threads in the color Fleece.)
- Dowel – 1x 4 foot wood dowel 1/2″ diameter. It made one big 20″ and two 13 3/4″ small wall hangings.
- Wood beads (optional)

Tools:
- Miter saw or hand saw
- Measuring Tape
- Scissors
Instructions:
Step 1: Use a saw to cut the dowel to 20″ in length. (My husband cut it for her.)


Step 2: Cut a piece of beige yarn 28″ in length with scissors.

Step 3: Attach yarn to each end of the wood dowel with knots.


Step 4: Hook the yarn and dowel onto a nail or hook on a wall.

Step 5: Measure and cut with scissors 15 pieces of colored yarn 56″ in length.

Step 6: Take 3 pieces of colored yarn.
Grab the center of them.
Loop them onto the center of the wood dowel and tuck the strands into the loop to create a Lark’s Head Knot. A Lark’s head knot is also know as a cow hitch knot.


Step 7: Repeat step 5 and 6 until you have 5 bunches of colored yarn attached to the wood dowel in Lark’s head knots.


Step 8: Measure and cut with scissors 18 pieces of beige yarn 48″ in length.

Step 9: Take 3 pieces of beige yarn, grab the center of them, and loop them onto the dowel next to the colored yarn.


Step 10: Repeat step 9 and place the yarn on the other side of the colored yarn.

Step 11: Continue adding beige yarn on each side of the colored yarn until there’s 3 bunches of beige yarn on each side.

Step 12: (Optional) To add a little texture to the wall hanging, wood beads can be added by sliding them into place.
If needed, you can use scissors to trim the yarn if you want it completely straight.
You’ll notice that Emanuelle did not put wood beads on ours and opted to not trim the yarn. She liked it as is, and I must say I do too!
And it’s finished!
DIY Yarn Wall Hanging
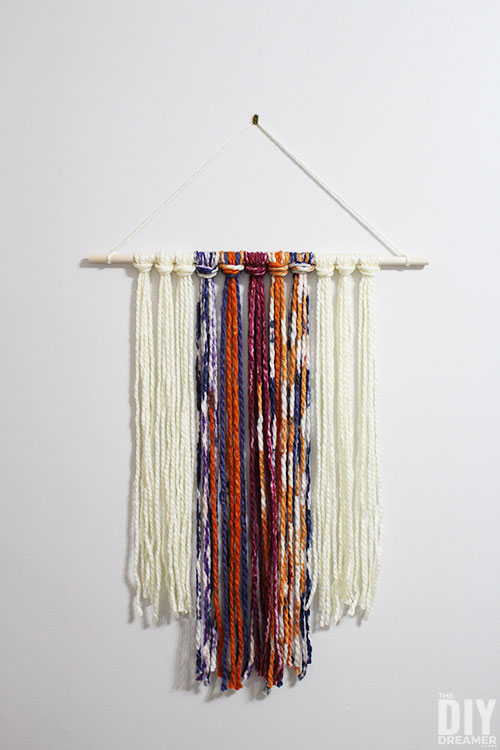
Doesn’t it look fabulous? I just love it!
Emanuelle loved making it so much that she made 2 more after making that one!
She made a smaller version for her sister in the same colors. And she made a smaller version for herself in pink, purple, and beige. The small wall hangings were both 13 3/4″ wide.
If ever you are looking for another fun wall hanging, you’ll love this upcycled rug wall hanging we made.
Looking for another great creative wall project, my how to plank a wall with wood paneling could be something that would interest you.
Yarn Wall Hanging Tutorial
Let’s admire Emanuelle’s creation again. Goodness is it ever beautiful! It looks beautiful in my kitchen too! Thanks Emanuelle for making it for me and making a tutorial for me to share!
Our kitchen is really starting to come together nicely! Now we need to get a new counter and new flooring, something that will look nice with our painted kitchen cabinets. Any suggestions?
UPDATE: My daughters made this together:
Rainbow Yarn Wall Hanging

Isn’t the rainbow wall hanging super cute? I love the bright cheerful colors!
The yarn they used to make the rainbow wall hanging was the left over yarn from our upcycled rug wall hanging.
The yarn is not as thick as our original wall hanging. So they used 10 strands of yarn per color, which makes bunches of 20 strands dangling down.
Rainbow colors to make rainbow yarn wall hanging
- 10 strands of beige yarn
- 10 strands of red yarn
- 10 strands of orange yarn
- 10 strands of yellow yarn
- 10 strands of green yarn
- 10 strands of blue yarn
- 10 strands of indigo yarn
- 10 strands of violet yarn
- 10 strands of beige yarn
The beige yarn represents the colors.
I hope we have helped inspire you to create your own yarn wall hanging for your home!
Have a great day!
Christine

How to Make a Yarn Wall Hanging
Learn how to make a yarn wall hanging. Easy DIY wall art that takes less than 1 hour to complete.
Materials
- 1x ball of colored yarn
- 1x ball of beige yarn
- Wood dowel 4 foot and 1/2″ diameter
Tools
- Miter saw or hand saw
- Measuring tape
- Scissors
Instructions
- Use a hand saw to cut dowel to 20″.
- Cut a piece of beige yarn 28″ long.
- Attach yarn to each end of the dowel with knots.
- Hook the yarn onto a nail or hook.
- Cut 15 pieces of colored yarn 56″ long.
- Take 3 pieces of colored yarn.

- Loop the center of the yarn over the dowel and tuck the strands into the loop to make a Lark's Head Knot.
- Make a total of 5 Lark's Head Knots with the colored yarn.

- Cut 18 pieces of beige yarn 48″ long.
- Take 3 pieces of beige yarn.
- Loop the center of the beige yarn over the dowel next to the colored knots and tuck the strands into the loop to make a Lark's Head Knot.
- Make 3 Lark's Head Knots on each side of the colored knots.
Notes
There's enough supplies to make one 20″ wide yarn wall hanging and two 13 3/4″ wide yarn wall hanging.
Recommended Products
As an Amazon Associate and member of other affiliate programs, I earn from qualifying purchases.
-
 Premier Yarns (3 Pack Isaac Mizrahi Lexington Acrylic & Wool Soft Irving Orange Blue Purple White Yarn for Knitting Crocheting #6 Super Bulky
 -
 Scotch Precision Ultra Edge Scissors, 8 Inch, 3-Pack (1458-3AMZ)
 -
 1/2 Inch x 48 Inch Wooden Dowel Rods - Unfinished Hardwood Dowels For Crafts & Woodworking - By Craftparts Direct - Bag of 5


Great tutorial! Thanks for sharing at Vintage Charm!
Tell your daughter I love it!
What a great DIY project! Very pretty result!
This is fabulous! I’m featuring it on the Little Cottage Link Party tomorrow. I hope you can drop by!