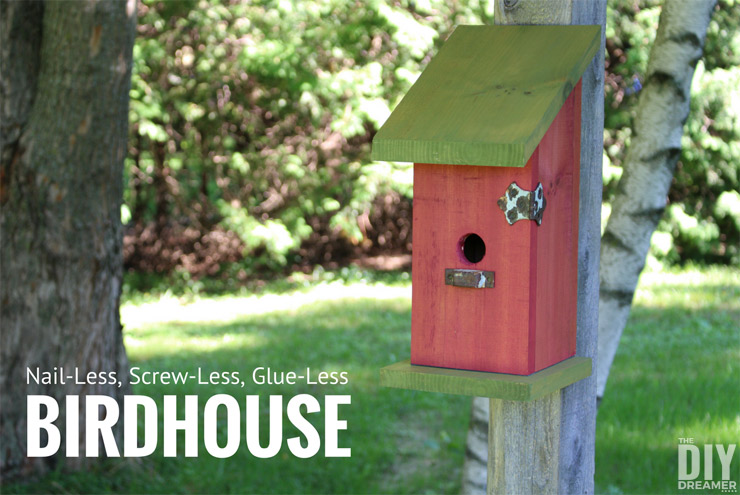
Building a Nail-Less, Screw-Less, Glue-Less Birdhouse
I am proud to be a 3M-sponsored blogger, and as a part of my responsibilities, I get the opportunity to evaluate 3M products. Opinions are my own and additional products used in the project were selected by me.
How about we have some fun and build something traditional like a birdhouse but in a non-traditional way? Sounds like fun, right?!
Hey! I’m so excited about today’s super cool DIY project!
You know how I love birdhouses, right? I’ve helped my Dad build lots of them throughout the years. Remember the blue birdhouses I shared with you?
Anyways, today I will be sharing with you another great DIY birdhouse, however this one will be quite different from the way we usually build birdhouses.
My friends at Scotch Brand sent me their new Scotch® Extreme Mounting Tape and Scotch™ Extreme Fasteners a few weeks ago.
When I saw how strong they were, I thought to myself “How about I test them out and build something with them?” And that’s when I thought about building a Nail-Less, Screw-Less, Glue-Less Birdhouse!
This post also contains some affiliate links for your convenience. Click here to read my full disclosure policy.

Nail-Less, Screw-Less, Glue-Less Birdhouse
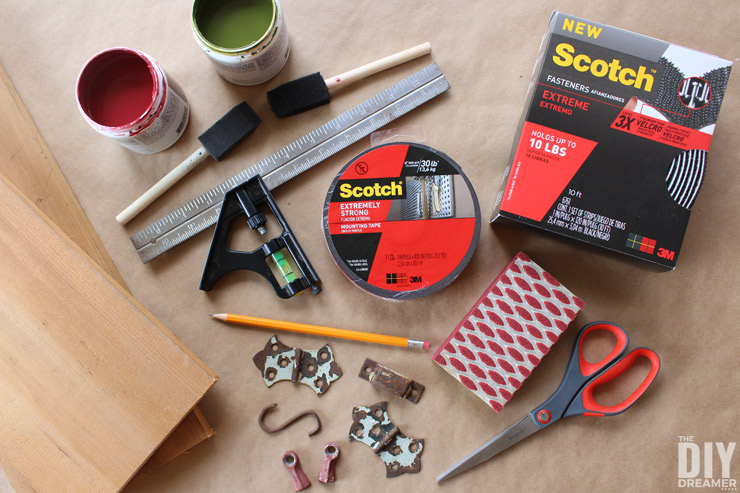
Supplies:
- Scotch® Extreme Mounting Tape
- Scotch™ Extreme Fasteners
- Wood
- Scissors (I LOVE my Scotch™ Precision Scissors!)
- Paint with foam brush, paper towel, wax paper, and water
- Hardware
- Sanding sponge (I use the 3M™ Pro Grade Precision Ultra Flexible Sanding Sponge.)
- Measuring tape or ruler
- Pencil
Tools:
- Compound miter saw
- Table saw
- Drill with 1 1⁄4 bit
Instructions:
Step 1: To build the birdhouse we needed 6 pieces of wood (base, roof, front, back, and two sides).
We used old pieces of wood that we had laying around. First thing we did was cut all the pieces we needed.
Cut list:
- Base: 6 1⁄2″ x 7″
- Front: 5 1⁄4″ x 10″ with bevel angle of 33.9 degrees
- Sides: 4″ x 10″ x 121⁄2″ with miter angle of 31.62 degrees
- Back: 5 1⁄4″ x 13″ with bevel angle of 33.9 degrees
- Roof: 6 1⁄2″ x 9 1⁄2″ with bevel angle of 33.9 degrees (on both ends but opposite from each other)
We find it easier to cut all the angles first, then we proceed to cut them down to size.
Once all the pieces are cut we dry fitted everything to make sure they fit together nicely.

Step 2: Next it was time to drill an entry hole on the front piece of the birdhouse.
Using a ruler, we placed a dot in the middle of where we wanted the entry for the birds. We used a 11⁄4 drill bit to drill the hole.

Step 3: Using our sanding sponge, we sanded down the edges of each piece of wood.


Step 4: Time to give the pieces some color!
Using the staining technique we usually use, we proceeded to stain each piece of wood.
We stained the roof and base in green, and the other pieces in red. (We used the same colors we had used for the Outdoor Christmas Countdown Marquee Sign.)

Step 5: The fun part! Time to start assembling the birdhouse! YAY!
To assemble the birdhouse we started off by placing the back piece flat on our work surface.
We then took out the Scotch® Extreme Mounting Tape and scissors.
We applied Scotch® Extreme Mounting Tape to the long side of one of the side pieces. We cut down the Scotch® Extreme Mounting Tape using the scissors. We then removed the backing from the tape and attached the side piece onto the side of the back.
We did the same thing to the opposite side.
We then pressed down on both sides for about 60 seconds to make sure everything had stuck in place.


Step 6: Once both sides were secured, we proceeded by applying more Scotch® Extreme Mounting Tape to the exposed edge of the sides.
We removed the liner from both pieces and placed the front over it, making sure it was lined up nicely over the edges.
We pressed down for 60 seconds.

Step 7: Next, we applied more Scotch® Extreme Mounting Tape to the bottom edges of the pieces we had just assembled.
Using the same steps as above, we lined up the bottom edges to the base (the base is flush to the back and then the edges are centered).

Step 8: Now time to attach the roof! For this portion, we opted to use the Scotch™ Extreme Fasteners.
Want to know why? We figured this way we’d be able to remove the roof easily once in a while in order to clean out the birdhouse. Birds love to fill birdhouses with whatever they find in order to make it comfy. When they move out it’s nice to empty it out so that other birds can come in and make their home.
We measured how many Scotch™ Extreme Fasteners we needed for each side and we cut the pieces to size.
Then we aligned and connected them to other pieces of fastener, trimming those down as well. We made sure to cut down the edges of the fasteners to fit nicely on the edges.
We removed the liner and attached the roof.
We pressed down on the roof for 60 seconds to make sure everything locked together perfectly.

Step 9: The birdhouse is looking like a birdhouse, but it needs a little something to add to the look.
We placed Scotch® Extreme Strong Mounting Tape behind pieces of old hardware we had laying around the house.


Step 10: Since hardware usually has holes to attach them with screws (but we don’t need screws because the Scotch® Extreme Strong Mounting Tape is doing a fabulous job) we were planning on cutting small pieces of twigs and sticking them where the screws holes were.
However, once we pressed down on the hardware, the mounting tape dimpled out of the holes, giving a fun nail-head look. We opted to keep it as is since we liked the look.

And voilà, we have a super cute Nail-Less, Screw-Less, Glue-Less Birdhouse!

P.S. We used the Scotch™ Extreme Fasteners to attach the birdhouse to the post!

Now, not only can we remove the roof to clean, we can take down the birdhouse easily in order to do so! GENIUS!


What do you think of the birdhouse?
I’m totally loving it!
We’ve been building similar birdhouses for years using nails, screws, and glues and let me tell you that this Nail-Less, Screw-Less, Glue-Less Birdhouse is as solid!
My favorite part though is that it makes building so much faster! No need to use clamps and having to wait for glue to dry. LOVE IT!
Have yourself a FABULOUS day!

P.S. I’ll be linking to these Parties.
Disclosure: A big THANK YOU to Scotch Brand for sponsoring this post. As always, all opinions in this post are 100% my own.


What a lovely birdhouse! I can’t believe that you didn’t use nails. I will have to give it a try!
Thanks so much! I’m quite proud of how it turned out. :)
Woah! This stuff looks incredible!! I need to try it out asap!
You really should! And it gets addicting to use.. hehe so many things can be attached using them.
This project is so perfect for so many reasons! I have tons of people comment on projects saying they are scared nailing or screwing or whatnot. BUT, this opens the door to so many possibilities! Awesome job thinking outside the box!
Yes!!! Exactly! This opens DIY to new people! It’s fabulous! :)
AH! I love a good bird house and this one is perfect!
Thanks Amy!
You’re kidding! I had no idea you could BUILD something without screws or nails! BRILLIANT!!!
hehe Thank you!! :)
I never would’ve thought it was possible to build something for outdoors using tape. This is genius!
Pretty cool, right?! :)
This looks like amazing stuff! I had no idea!
They really are!! Both products have such a strong hold, I loved working with them!
Christine! I love this and I am such a fan for 3 M products. They are so very innovative. We have 3 M all over my house. My husband likes them as much as I do. I will search out this product for sure. Perfect for the kids building things. This will make it easier for them. Thanks! I love your birdhouse. So cute!!
Awesome!! Yes they products are so easy to fall in love with!
So happy you like the birdhouse!
WOW that is a beautiful birdhouse! This sounds like something my older girls would love to do on a weekend. I will definitely have to check out those Scotch products – super cool!
Yay!! Yes, I know your girls would love to work on a DIY project with you! Have fun!
That is so cool, and so simple to put together! I will have to find those products and give them a try. :)
Thanks Lisa!! Let me know if you make one and have any questions! I’d be happy to help out!
What a cute project – and super impressed that you did not need any nails. Great to get the kiddos involved once all cutting has been done
Looks like clever stuff, definitely worth keeping my eyes open for. your little birdhouse is adorable.
How cute! Thank you for sharing at Home Sweet Home!