How to make a 3D Wood Snowman
This 3D Wood Snowman measures 4 feet and makes a great DIY outdoor Christmas decoration.

Last year I shared how to make a 3D wood Christmas tree and if you recall, I mentioned that I wanted to make a 3D wood snowman too.
I’m super excited to say that we did!! It was so much fun making it!

This post also contains some affiliate links for your convenience. Click here to read my full disclosure policy.
How to make a 3D Wood Snowman
Supplies:
- Plywood – 2 piece of plywood 4′ by 24″ 5/8″ thick
- 1 piece of plywood left as is 4′ by 24″
- 1 piece of plywood cut to 2′ by 24″
- Graph paper
- Wrapping paper with cutting grid on the back
- Painters tape
- White outdoor paint
- Black outdoor paint
- Orange outdoor paint
Tools:
- Pencil
- Ruler
- Scissors
- Jigsaw
- Orbital sander
- Sawhorse
- Paint brush
- Foam pouncers
Instructions:
Step 1: Cut out a piece of graph paper to 24 squares wide and 48 squares high.
I had to use tape to attach another piece of graph paper in order to have it 48 squares high.
Note: Each square represents 1 inch.

Step 2: Fold the graph paper in two vertically.

Step 3: Using half the graph paper, draw half of a snowman.

For a reference:
- I started my snowman at square 7 at the bottom.
- First snowball ended at 20 squares up and 6 squares in.
- Second snowball ended at 15 squares up and 3 squares in.
- Third snowball ended at 7 squares up and 3.5 squares in.
- Hat rim 3 squares, 1.5 square high, top of rim 3 squares, and 5.5 squares high.

Step 4: Keeping the paper folded in half, cut out the half snowman.


The purpose of Step 1 through 4 is to see what the snowman will look like. If you like how the snowman turned out, continue to Step 5.
If not, modify your snowman template until you are happy with it.

Step 5: Take out wrapping paper with a cutting grid on the back.

To replicate the snowman template, cut the wrapping paper 24 squares wide and 48 squares high.
Each square represents 1 inch.

Step 6: Repeat Step 2 through Step 4 using your graph paper snowman as your guide.
Fold the paper in half.

Replicate your little snowman onto the wrapping paper.


It looks like a snowman already! Yay!

Keep it folded in half and cut it out.


Step 7: Place the 4 feet snowman template on a piece of plywood and trace it.

If ever you find that the snowman template is moving around, use painters tape to hold it down in some places.


Step 8: To make the bottom part of the snowman cut out the bottom snowball from the template.
My snowball measures 20 ¾″ high.


Step 9: Trace the snowball on the remaining piece of plywood.


Step 10: Use a jigsaw to cut out the snowman and the snowball.

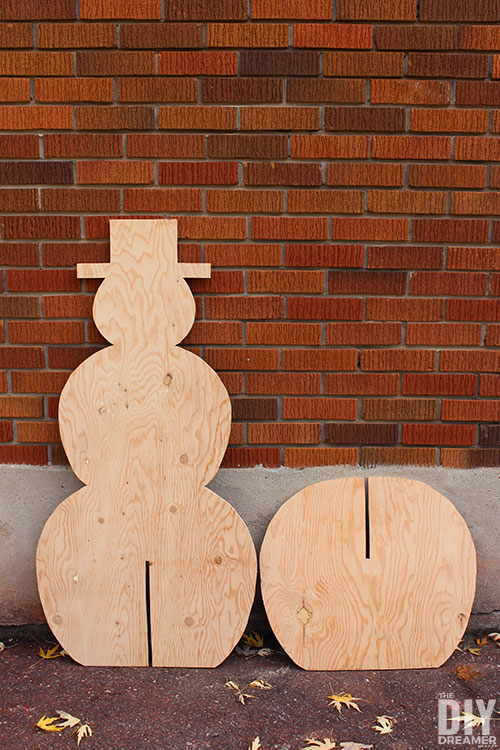
The plywood snowman!


Step 11: In order for the snowman and the snowball to be attached together, a slit needs to be cut out of both pieces.
- The snowman needs a slit centered at the bottom 11 ¾″ long
- The snowball needs a slit centered at the top 9″ long.
11 ¾″ plus 9″ equals the height of the snowball 20 ¾″.
Use a scrap piece of plywood to trace the width of the slit.
Working on the snowball:


Time to cut out the slit.


Working on the snowman:


Cut out the slit.


Step 12: Use an orbital sander to smooth the pieces.


Step 13: Dry fit the 3d wood snowman together to make sure the pieces fit together.


I love it already!

Step 14: Place the snowman on sawhorses and apply a piece of painters tape on the rim of the hat.

Step 15: Paint both sides of the snowman and the snowball in white outdoor paint. Apply two coats.

Remove the painters tape right after applying the second coat of paint, while the paint is dry.

Step 16: Apply painters tape below the rim of the hat.

Step 17: Paint both sides of the hat in black. Apply two coats.

Remove the painters tape while the paint is still wet.


Step 18: Use a pencil and lightly draw eyes, nose, mouth, and buttons on the snowman.

Step 19: Use a paint brush and/or foam pouncers to paint.
I like to erase my pencil marks prior to painting, it still leaves enough markings for me to see where to apply paint.
Making the eyes:


Painting its orange nose.

Painting its smile.


Look at the snowman’s adorable face! So cute!


Step 20: Insert both pieces together to form the 3D wood snowman.


3D Wood Snowman

What do you think of the snowman?
I really like how it turned out!!
I’m thinking of maybe adding a little wood cardinal on the rim of the hat. What do you think?
I could also add branches to make arms, but I like it without for now.
Do you ever DIY your outdoor Christmas decorations?
If ever you are looking for more ideas, I also made a Christmas tree wood lantern and an outdoor Christmas marquee countdown sign.
I hope I have inspired you to create your own DIY Christmas projects!
P.S. Admit that the wrapping paper idea to make a template is pretty genius, right? I even used that method to hang a gallery wall!
Have a wonderful day!


3D Wood Snowman
Learn how to make a 3D Wood Snowman with plywood. The wood snowman measures 4 feet tall. Wonderful DIY outdoor Christmas decoration.
Materials
- Plywood – 2 pieces of plywood 4′ by 24″ 5/8″ thick - See notes below
- Graph paper
- Wrapping paper with cutting grid on the back
- Painters tape
- White outdoor paint
- Black outdoor paint
- Orange outdoor paint
Tools
- Pencil
- Ruler
- Scissors
- Jigsaw
- Orbital sander
- Sawhorse
- Paint brush
- Foam pouncers
Instructions
- Cut a piece of graph paper down to 24 squares wide and 48 squares high.
- Fold the graph paper in two.
- Draw half a snowman.
- Cut out the snowman.
- Cut the wrapping paper 24 squares wide and 48 squares high.
- Fold wrapping paper in half.
- Replicate the graph paper snowman onto wrapping paper.
- Cut out the snowman template.

- Trace the snowman template onto the 4′ by 24″ piece of plywood.
- Make a snowball template by cutting out the bottom snowball from the snowman template.
- Place the snowball template on the 2′ by 24″ piece of plywood.
- Trace the snowball.
- Cut the snowman and snowball out of the plywood with a jigsaw.

- Both pieces need slits cut out of them in order to fit together. The snowman needs a slit at the bottom 11¾″ long and the snowball needs a slit at the top 9″ long. Use a scrap piece of plywood to trace the width of the slit. Cut out the slits using a jigsaw.

- Dry fit the pieces together to make sure they fit well.

- Sand the pieces smooth with an orbital sander.
- Paint both sides of the snowman and snowball. The bodies in white and the hat in black.
- Draw a face on the snowman using a pencil.
- Paint the face and buttons.

- Assemble the 3D wood snowman.

Notes
Plywood
- 1 piece of plywood left as is 4′ by 24″
- 1 piece of plywood cut to 2′ by 24″


This is super cute and clever. Thank you for sharing it over on the Farmhouse Friday link party. Hope you link up again soon. Pinned! :)
So creative ! We would love for you to share your post with us at our weekly blog link party – Meraki Link Party at https://doodlebuddies.net/2020/12/01/meraki-link-party-16/ – the party is from Monday thru till Thursday.
Thank you
Naush
Oh how smart to use the grid on the back of wrapping paper! Cute project.