How to Build a Screen Door – DIY Screen Door
Building a screen door is a great DIY project that will add beautiful character to your home. Learn how to build a screen door with this tutorial.
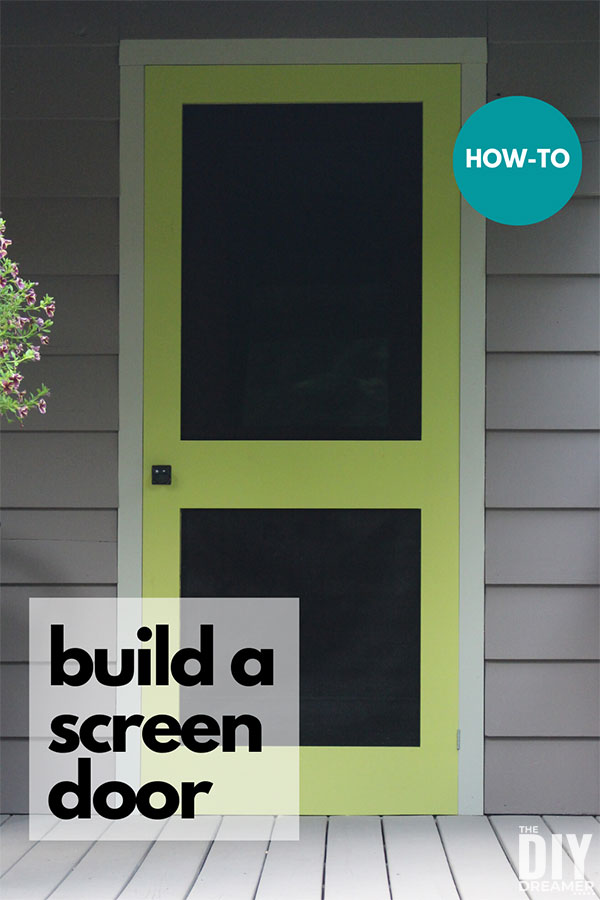
A couple of weeks ago I shared with you my DIY Screen Door that I built with my hubby and Dad.
We had been wanting a screen door for our back porch for years but never got around to putting one in until we updated our back porch.
We had been shopping around for one but we could never find a model that we liked.
My Dad suggested that we build one instead, like that we would have exactly what we want.
My Dad built the screen doors that are at my parents’ house.
The ones he built have beautiful woodwork in each corner. They are absolutely stunning and are perfect for their 1890’s home.
For our home, I wanted something simple. I started by drawing what I wanted.
After that we measured the inside of the door frame so that we could determine the dimensions of the screen door.
Next we figured out how much wood we needed to make our screen door come to life.
This post contains some affiliate links for your convenience. Click here to read my full disclosure policy.

DIY Screen Door
Supplies:
– Wood (We got 1 1×8 10′ and 2 1×6 10′.)
– Biscuits for plate joiner
– Glue
– Screen
– 3/4″ 16′ long Screen Moulding
– Paint
– Hinges with screws
– Door Handle
– Hydraulic Door Closer kit
Equipment:
– Saw (Radial, Circular, Miter, or whatever you have to cut wood.)
– Table Saw
– Tape Measure
– Square
– Clamps
– Plate Joiner
– Hand Saw
– Palm Sander
– Chisel
– Hammer
– Miter Box
– Stapler
– Nail Gun
– Pencil
Instructions:
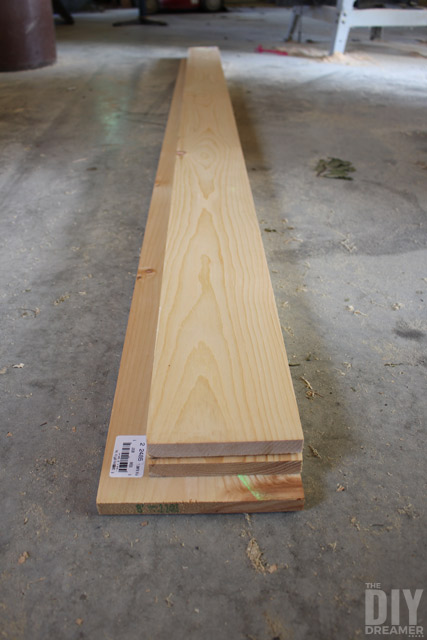
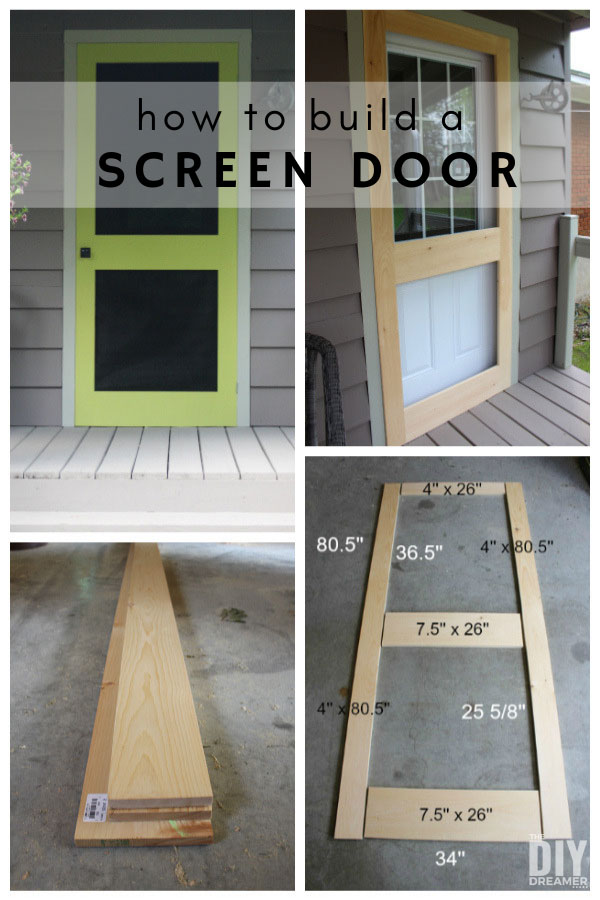
Step 1: We started off with a 1×8 10′ long and 2 1×6 10′ long.
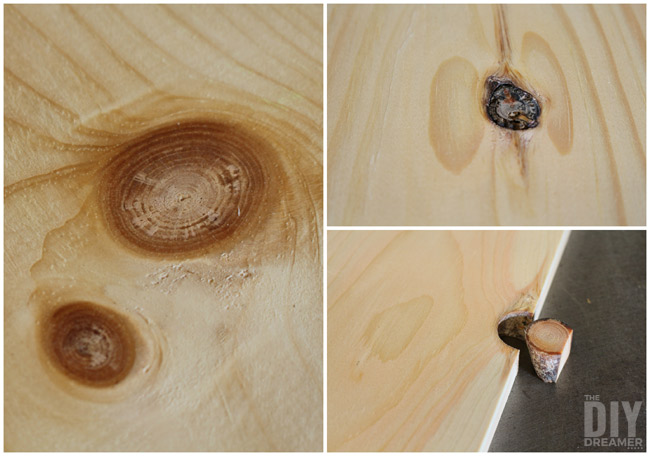
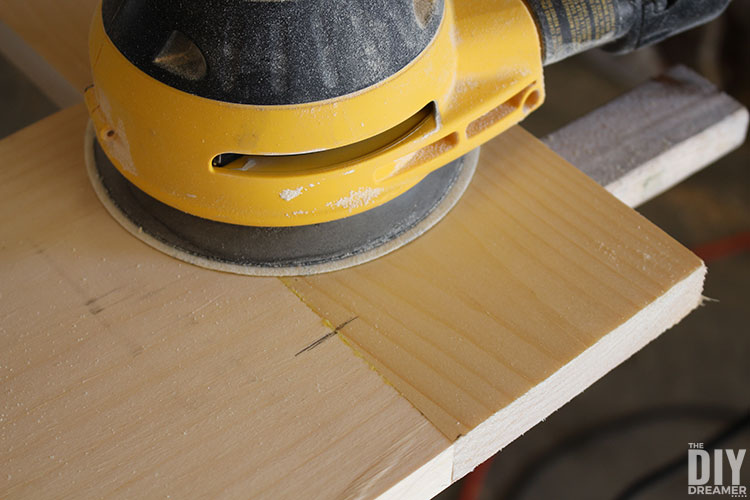
Tip: When buying wood check the knots on the boards. You want to avoid dead knots.
Dead knots are often black and sometimes it’s just the contour of the knot that’s black.
Dead knots tend to fall out, especially if you cut through them.
The picture on the left shows a regular knot and the right side are dead knots.
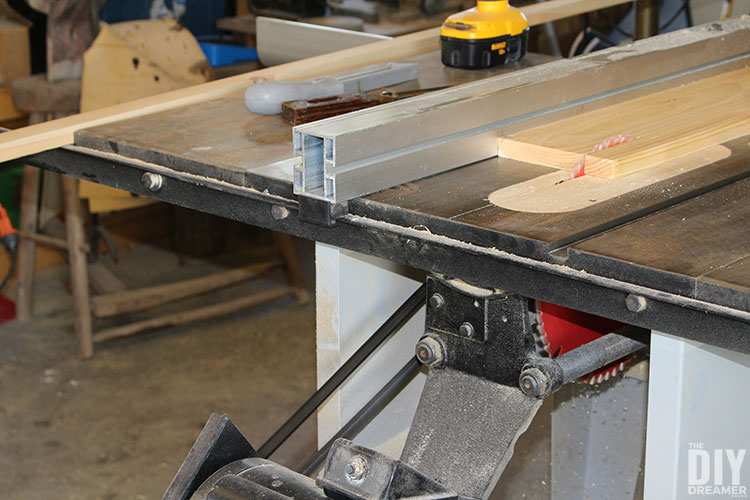
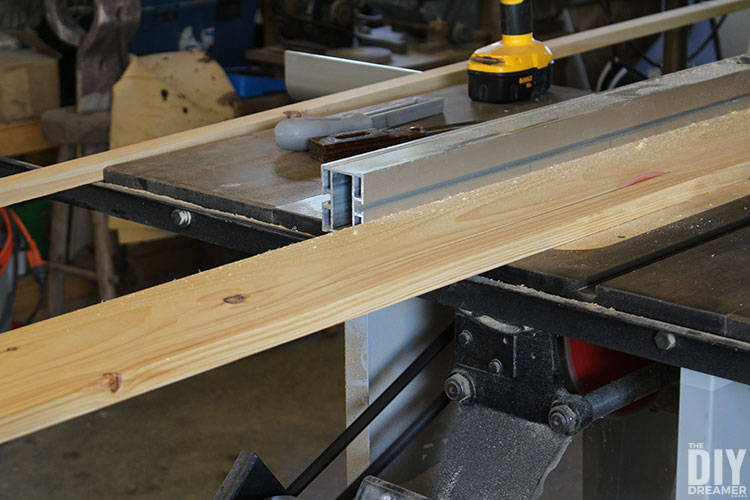
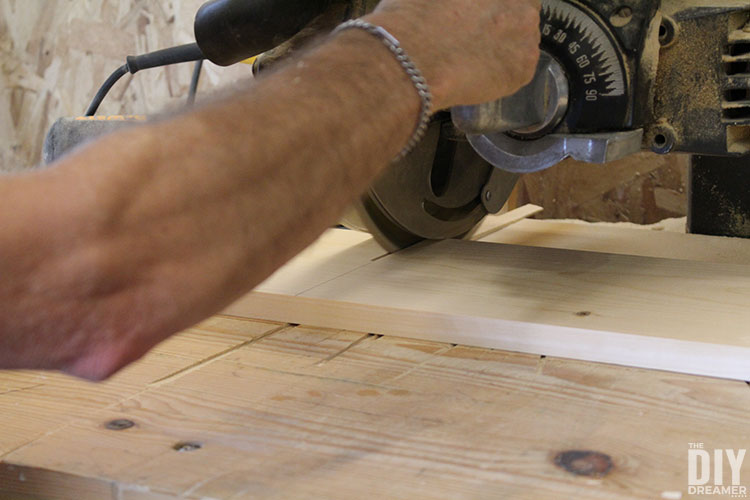
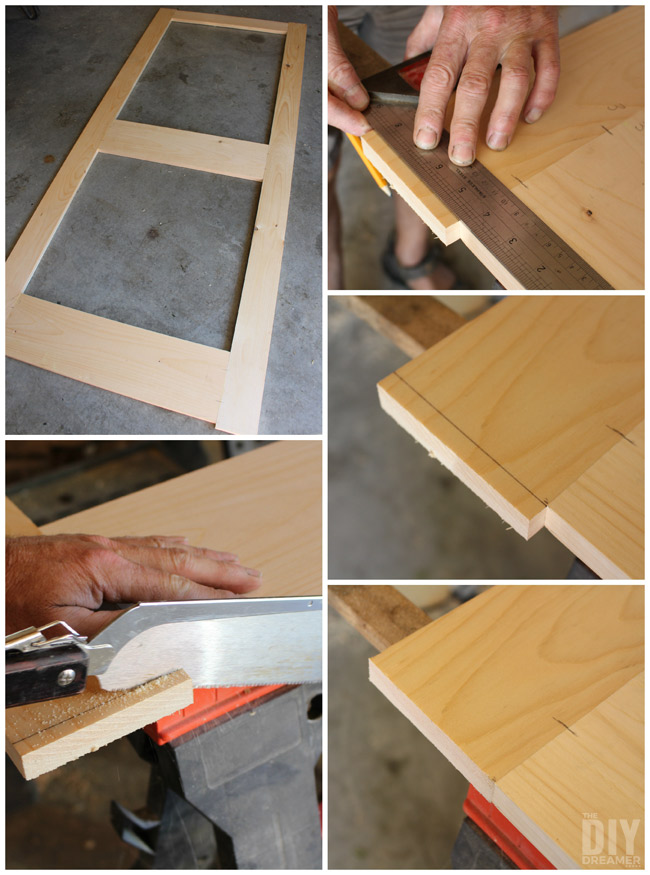
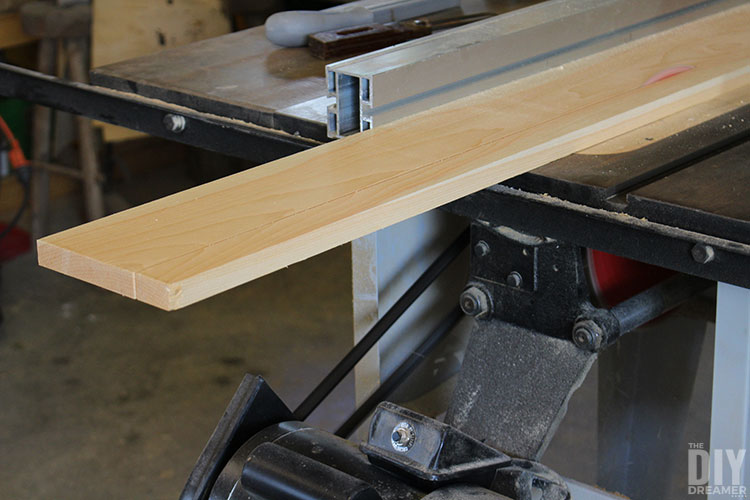
Step 2: We used the radial saw and table saw to cut the boards down to the sizes we needed.
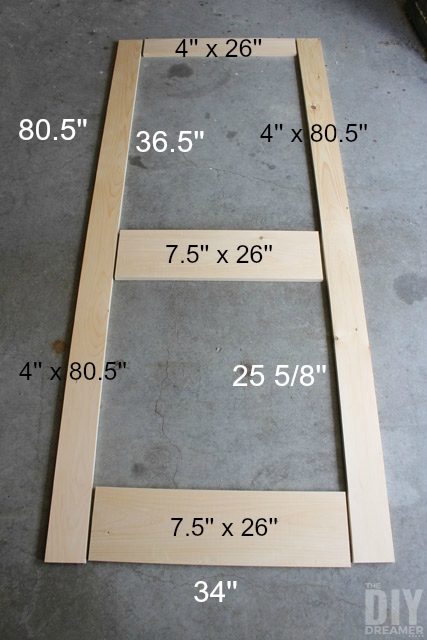
We needed two pieces of 26″ from the 1×8. We also striped the 1×6 to 4″ wide and then we cut them into 2 pieces of 80.5″ and 1 piece of 26″.
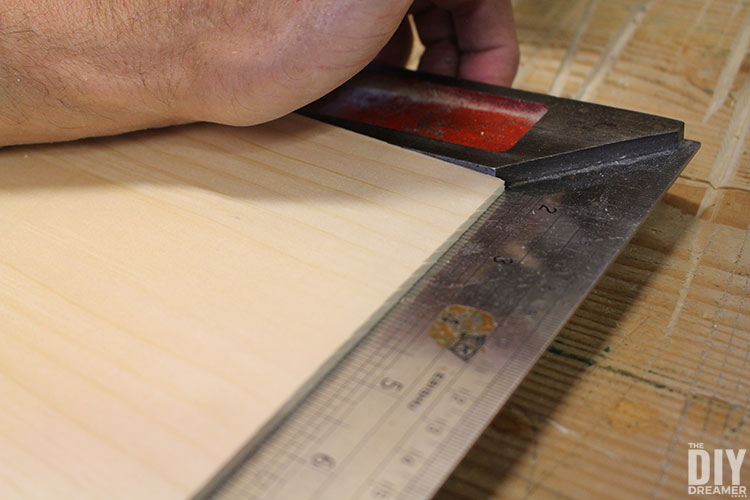
Once the pieces were cut we used a square to make sure they were square.
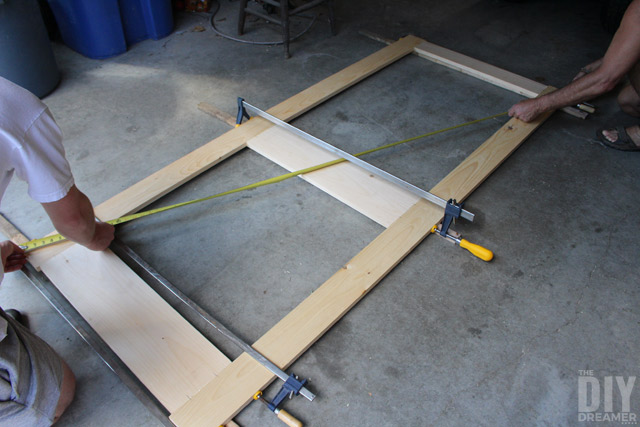
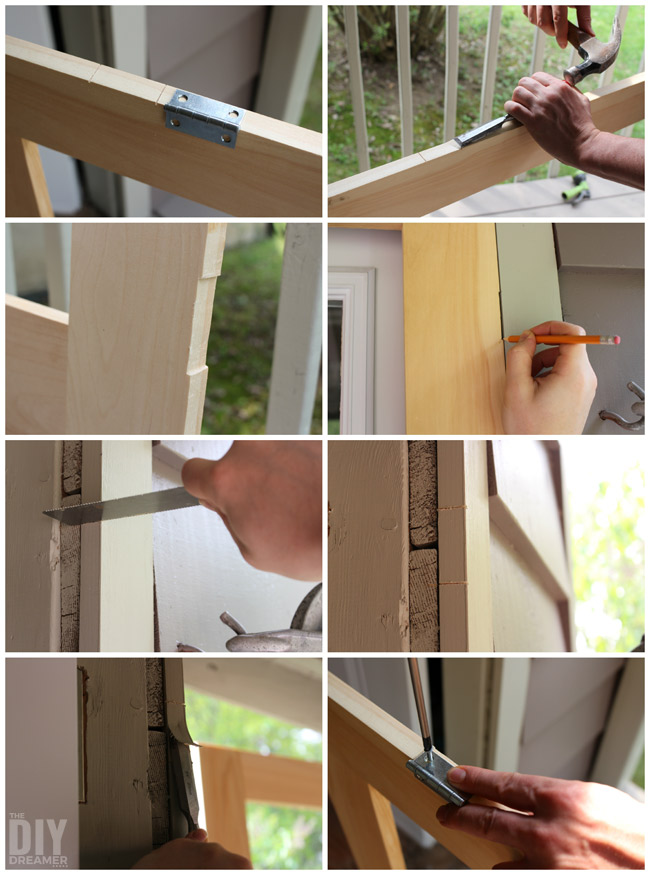
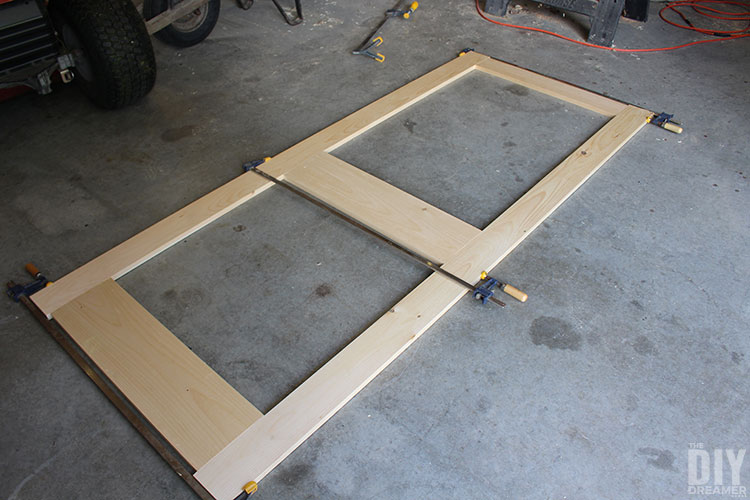
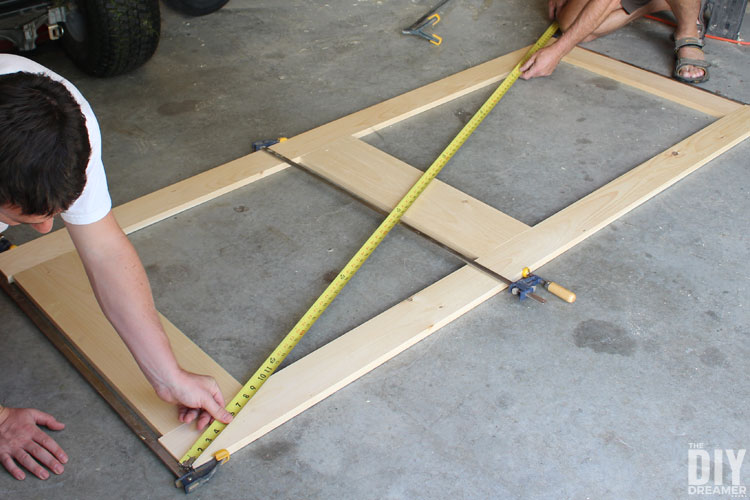
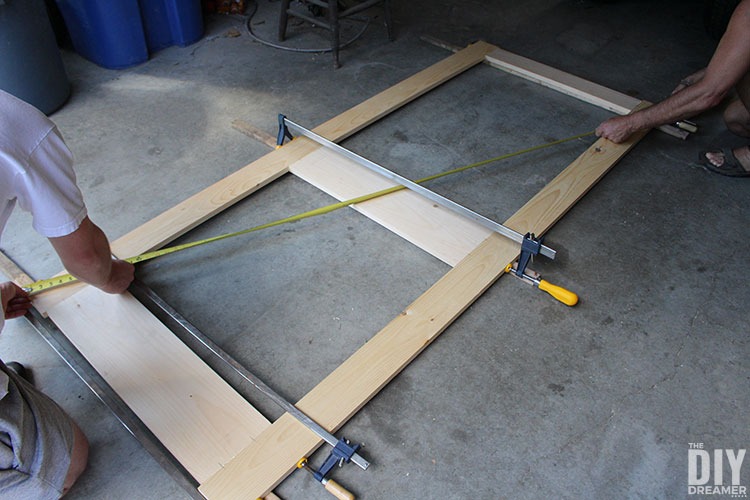
Step 3: We clamped all the pieces together.
We measured the door corner to corner with a measuring tape to make sure it was square. We knew it was square when each diagonal measurement were exactly the same.
You’ll notice an over hang of wood (extra wood) on each end, we did this one purpose. This allows us wiggle room if ever the door wasn’t perfectly square.

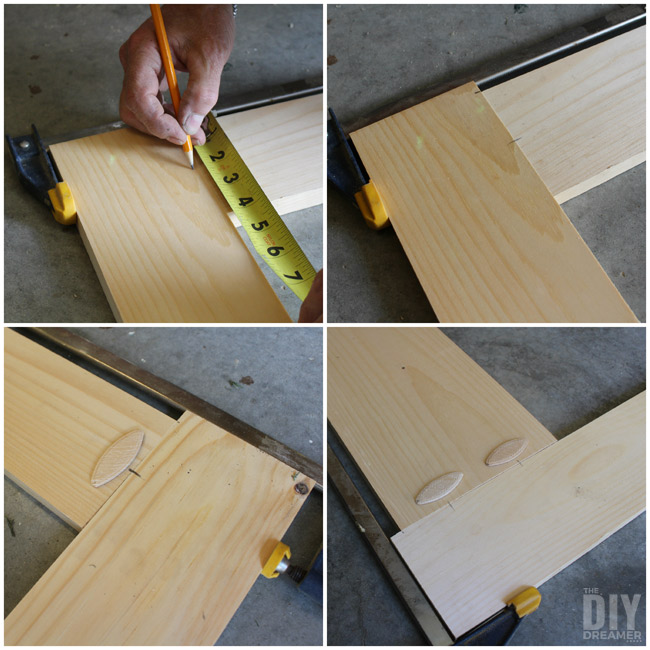
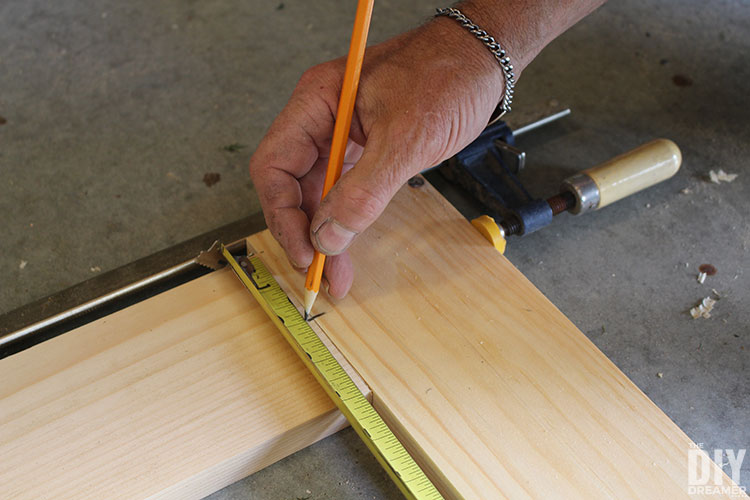
Step 4: Next was time to figure out where we were going to put biscuits to join the pieces together.
We put only one marking on each side of the top board since it’s only 4″ wide.
We then put two markings on each side of the middle board and lower board because they are wider. The markings must run through each side of the board so that the marking also shows on the board against it.
Also, it’s a good idea to number them so that you know which board goes where.
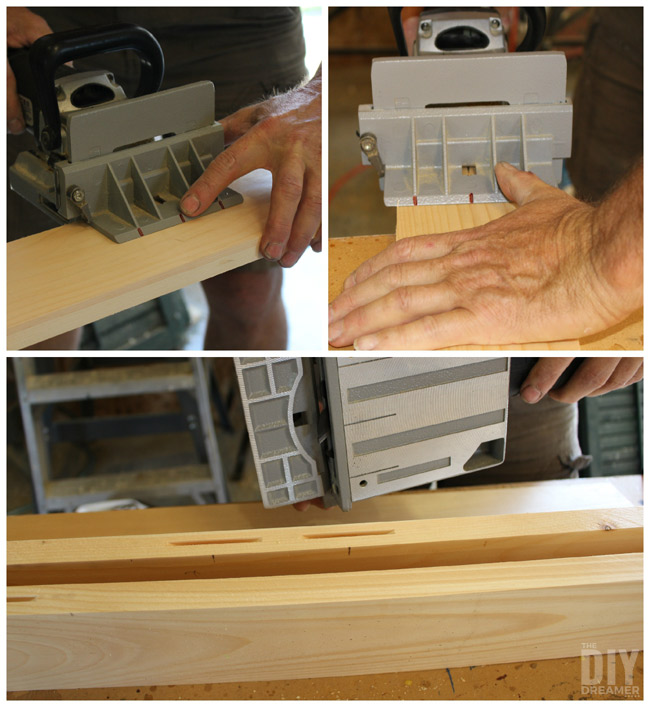
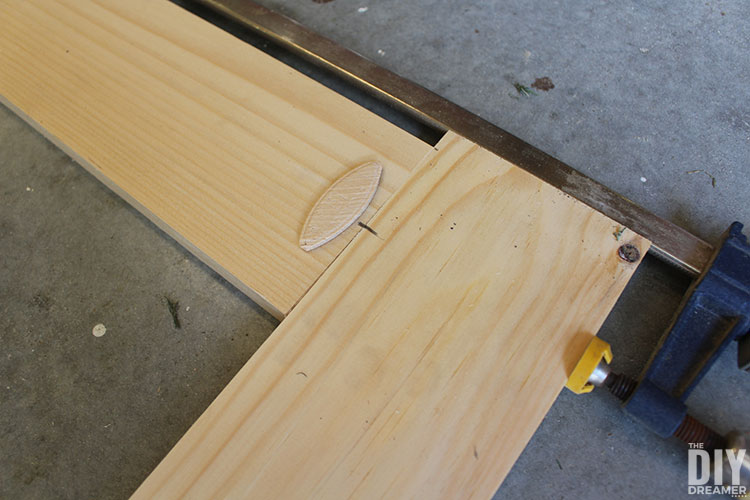
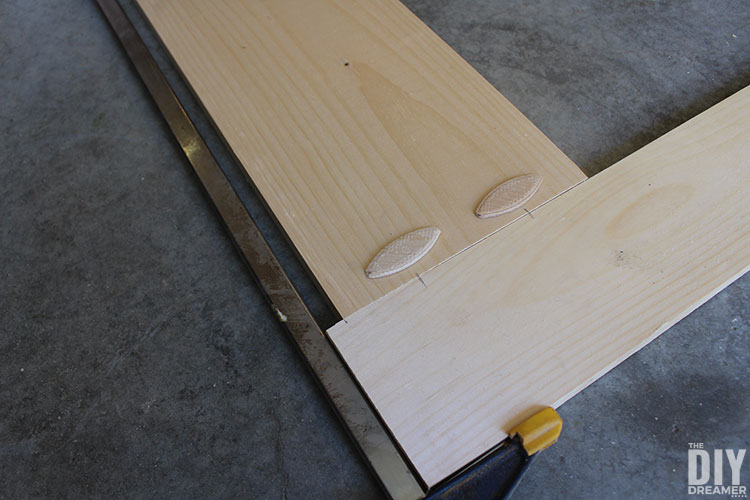
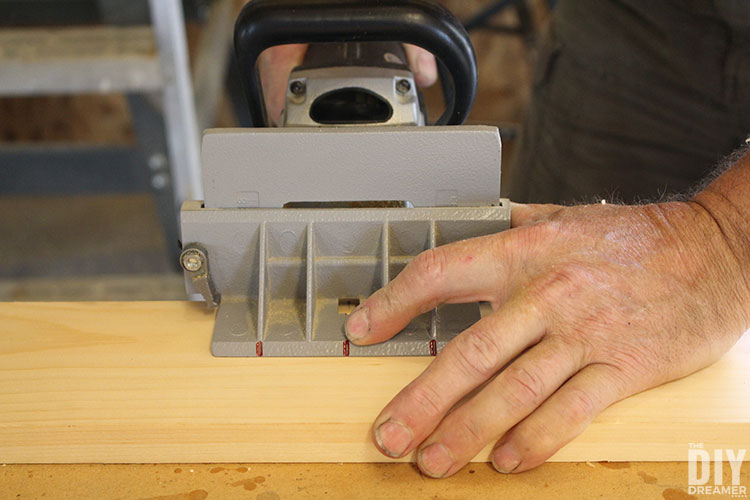
Step 5: We took the clamps off the door and it was time to use the plate joiner.
We lined up the lines with the plate joiner and made the biscuit holes. We made 20 biscuits holes.
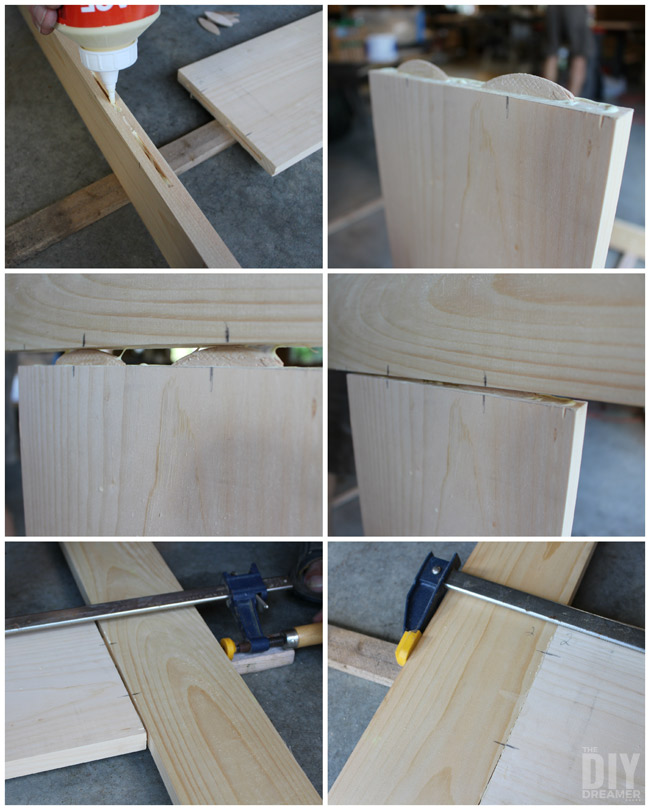
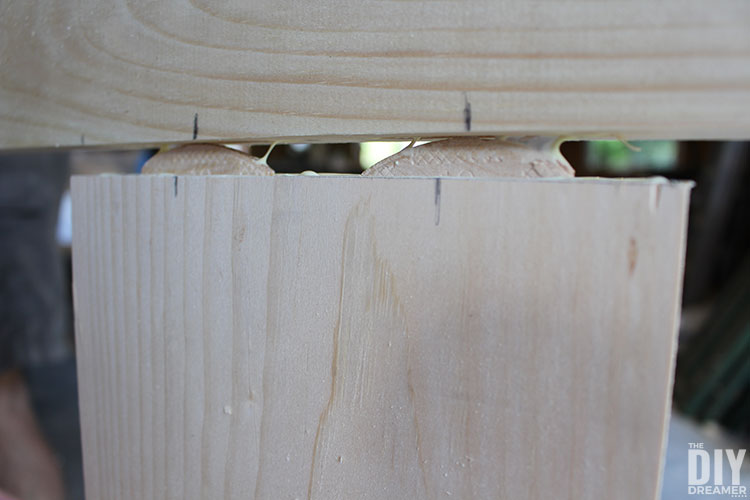
Step 6: We applied glue inside the biscuit holes and inserted biscuits on one end.
We applied glue on the other end and inserted the board with the biscuits making sure the lines were aligned.
Once all the pieces were attached together, we proceeded to clamp everything together again.
Step 7: Using the same technique as Step 3. We measured the door corner to corner with a measuring tape to make sure it was square.
We knew it was square when each diagonal measurement were exactly the same.
Step 8: Once the glue was dried we removed the clamps.
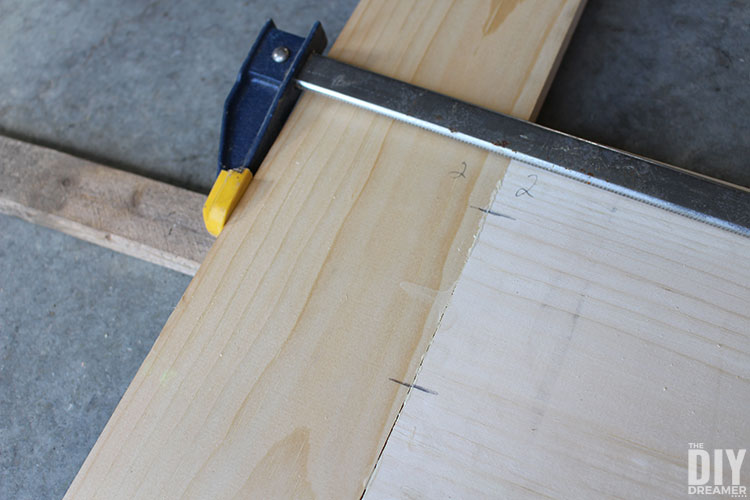
Just a reminder from the point I made in Step 3: As you can see in the above and below photo we had extra wood on each end of the door. We did this so that if ever the door wasn’t square we were able to slide the pieces up or down until square, in other words, it gave us wiggle room.
Now that the door was glued together and square, we no longer needed the wiggle room, so time to cut off the extra wood.
We used a square to mark off what we needed to cut off. We used my Dad’s favorite hand saw to saw off the pieces.
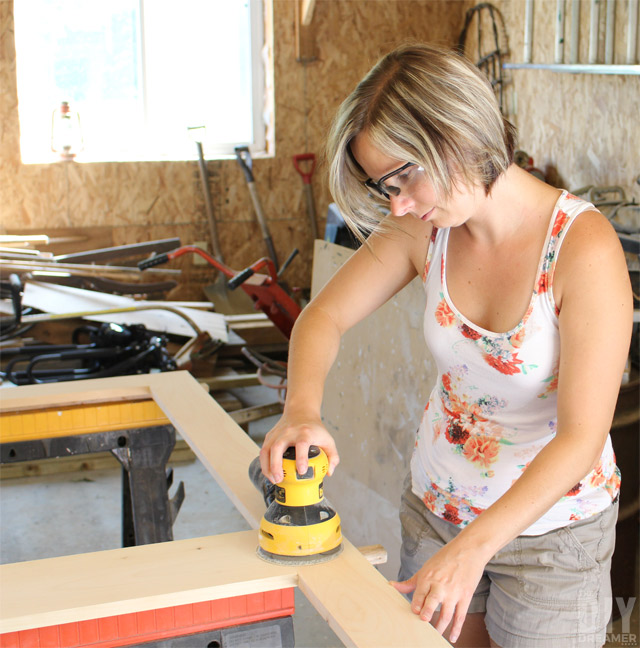
Step 9: Time to sand the door, making sure it’s nice and smooth.
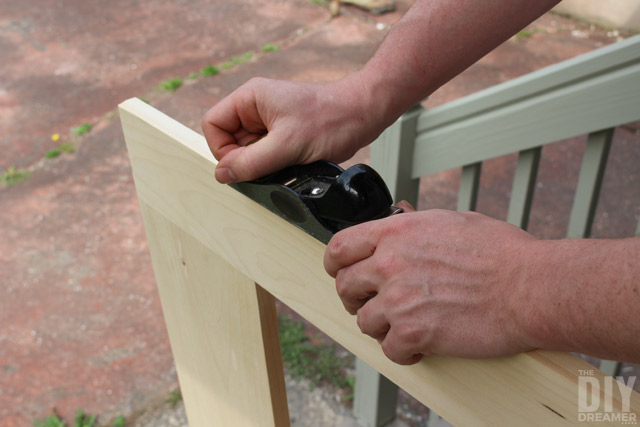
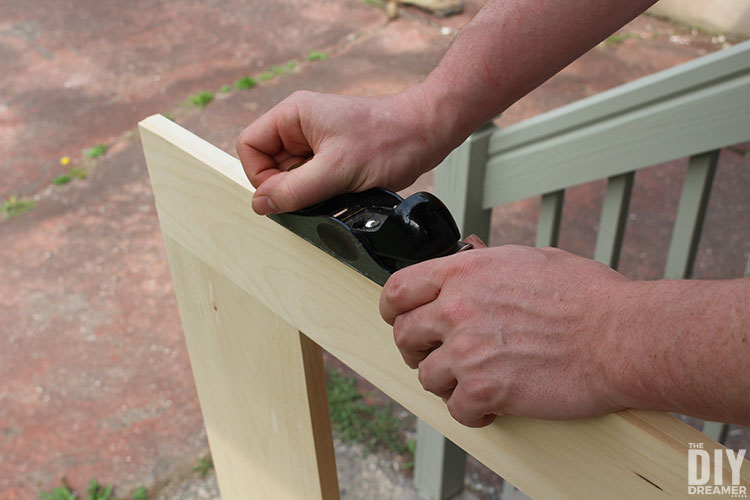
Step 10: We placed the door in its home, to see how it fit. It was a little tight, so we used a hand planer to remove a little bit of wood around the door.
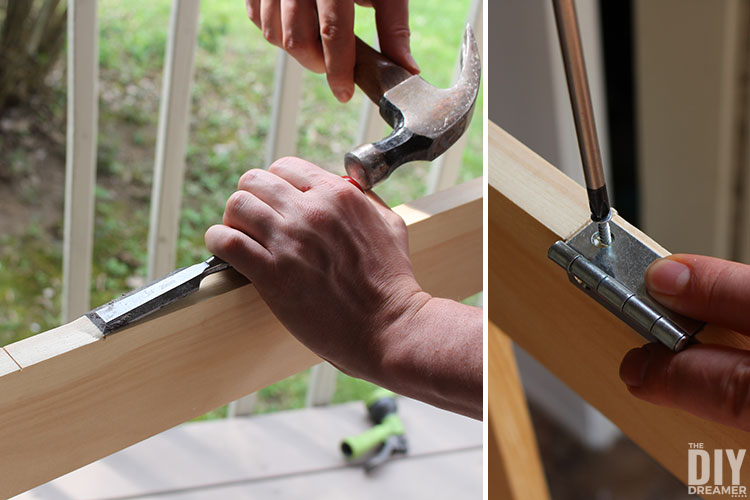
Step 11: We used a chisel & hammer and hand saw to cut slots for the hinges.
We made slots 7″ from the top and 7″ from the bottom of both the door frame & door.
We then proceeded to attach the hinges to make sure the door worked correctly.
We removed the hinges from the door after we determined the door worked.
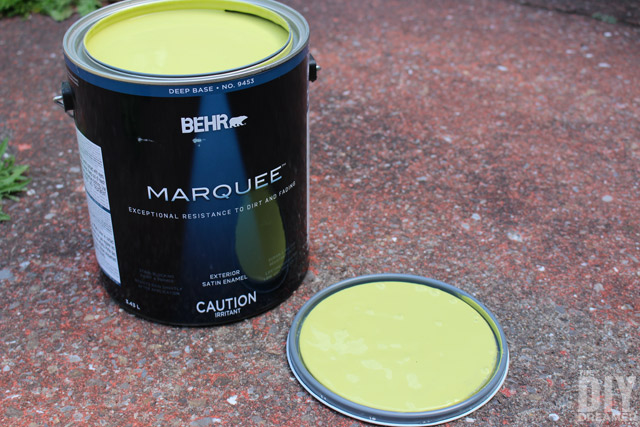
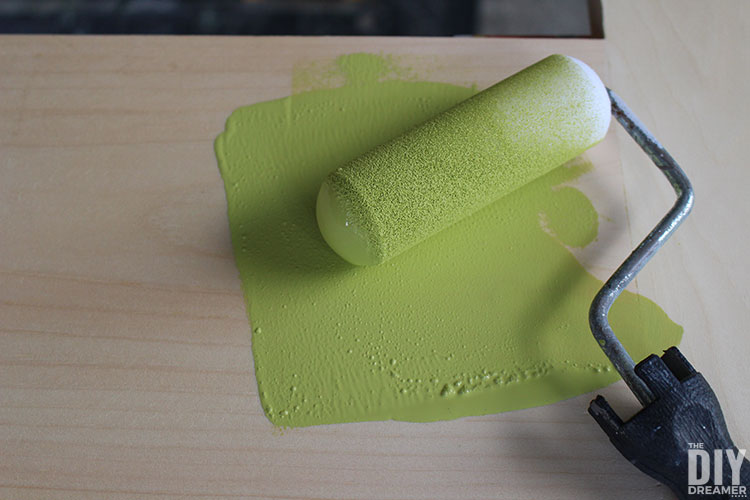
Step 12: Time to get some painting done. Yay!!
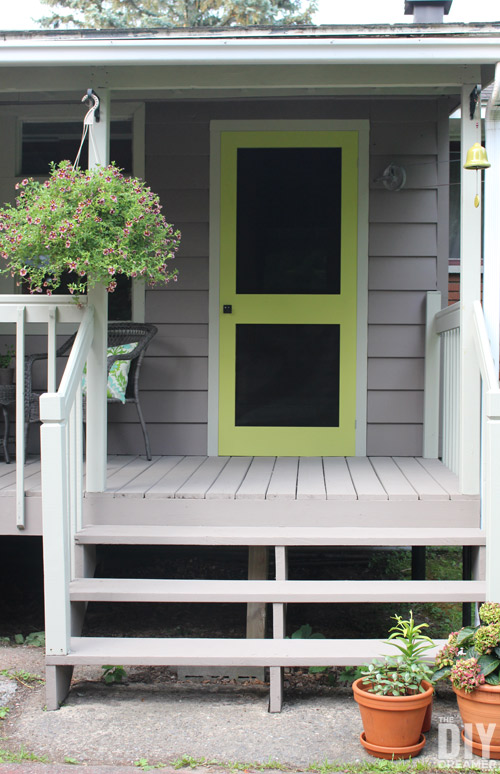
I painted the door in BEHR MARQUEE™ Exterior Satin Enamel in Pistachio. I also painted the screen moulding at the same time.
Since BEHR MARQUEE is a Paint & Primer in one, I didn’t have to apply a primer before painting. SWEET! I’m all for saving time!

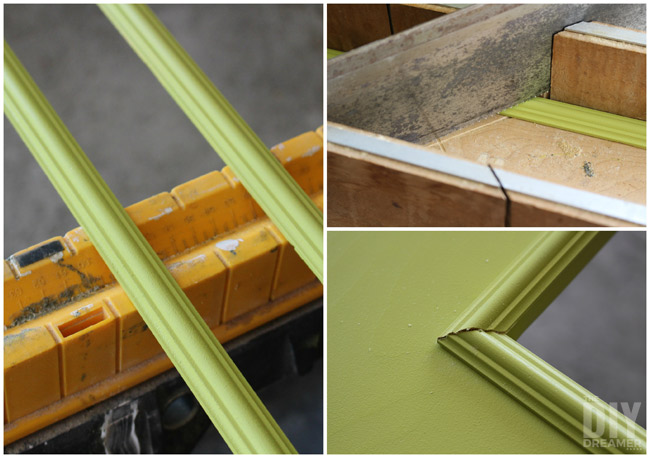
Step 13: Next we took out the miter box and cut the screen moulding to size.
We used the screen moulding as the finishing touch for the back of the door, looks so much nicer than just leaving the screen and staples exposed in the back.
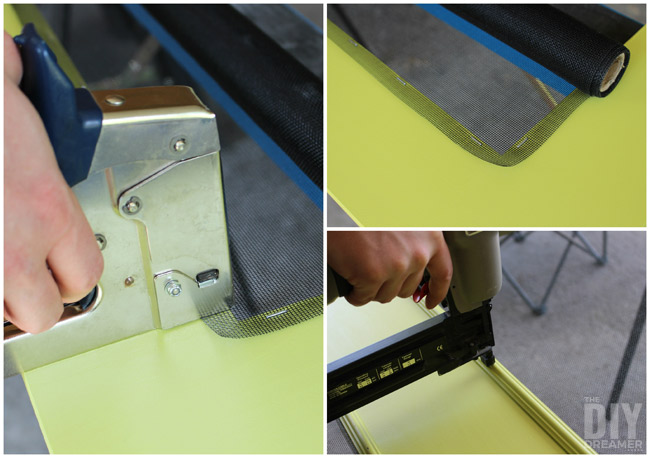
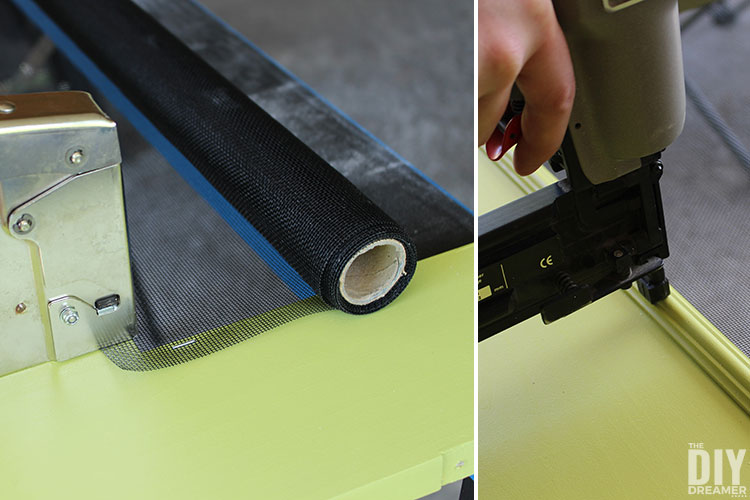
Step 14: Time to add screen to the door!
We slowly unrolled the roll of screen over the openings.
As we unrolled we fastened the screen with staples.
When we were done attaching the screen, we added the screen moulding and attached it with little nails.
If you have a nail gun, use it.. it makes the process so much faster.
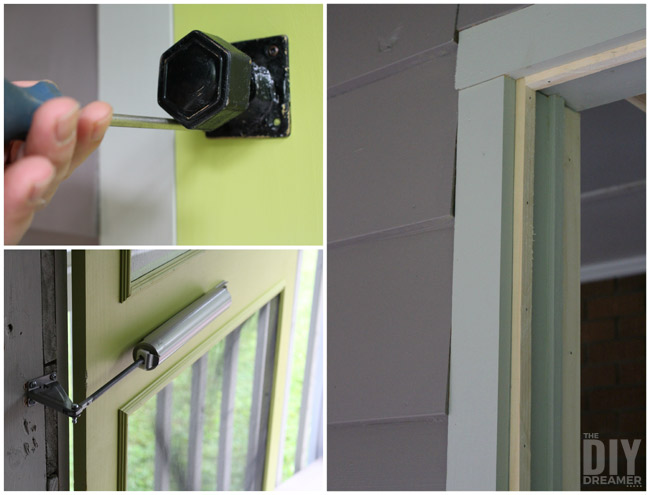
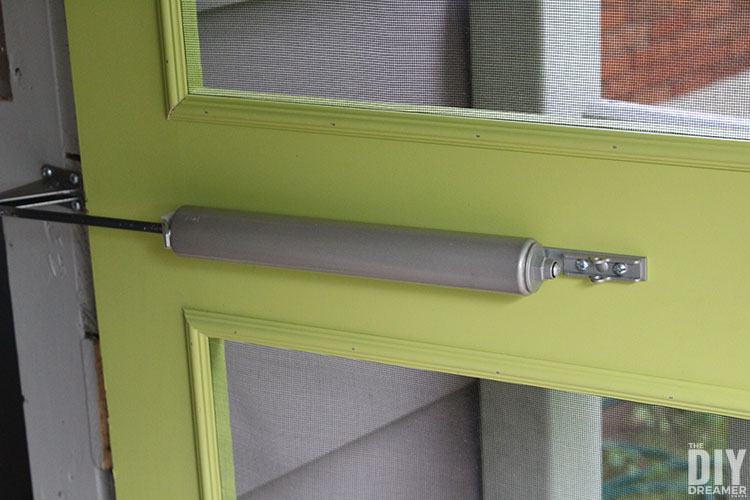
Step 15: We then reinstalled the hinges and attached the door to the door frame. We were quite excited about installing the door handle.
The door handle was actually a working door handle that we found on a door in the basement that we weren’t using. We loved how it looked and knew it would look great on our screen door.
We uninstalled the handle and had to solder the handle to the square bracket. Once that was done we painted the door handle black. I sure wish I had taken a before photo, but sometimes you get so excited about something you just do it. haha
We also added a wooden door stop moulding around the door frame so that the door would close properly.
Lastly, we put in a hydraulic door closer.
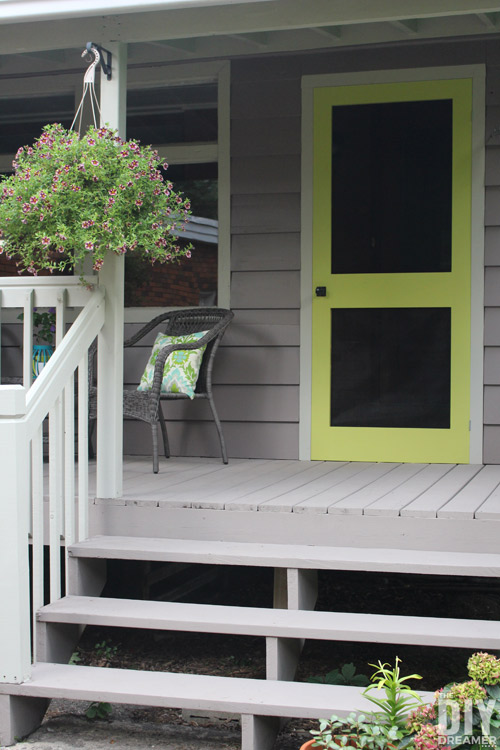
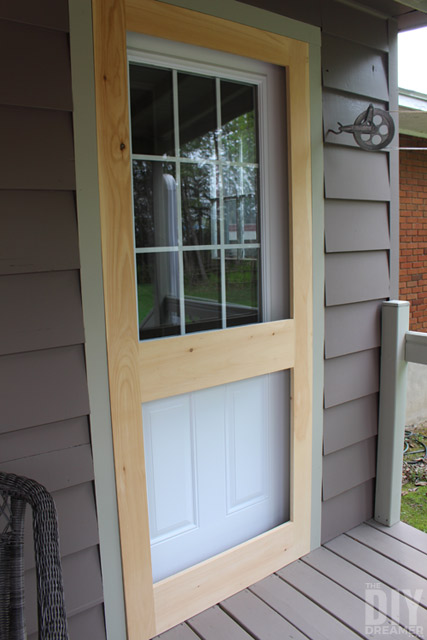
Voilà, our beautiful
Custom DIY Screen Door
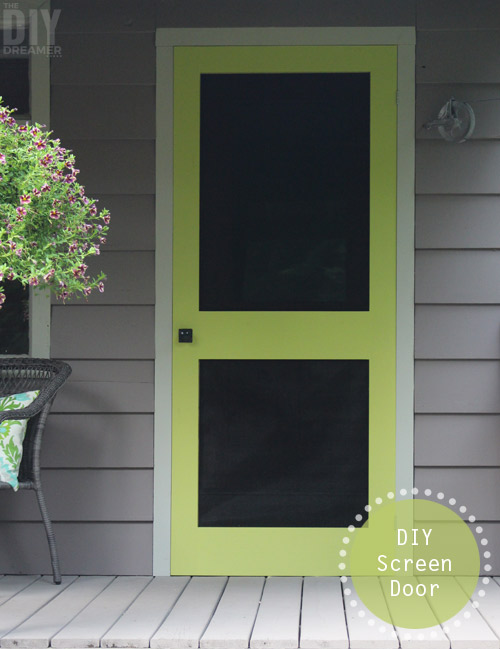
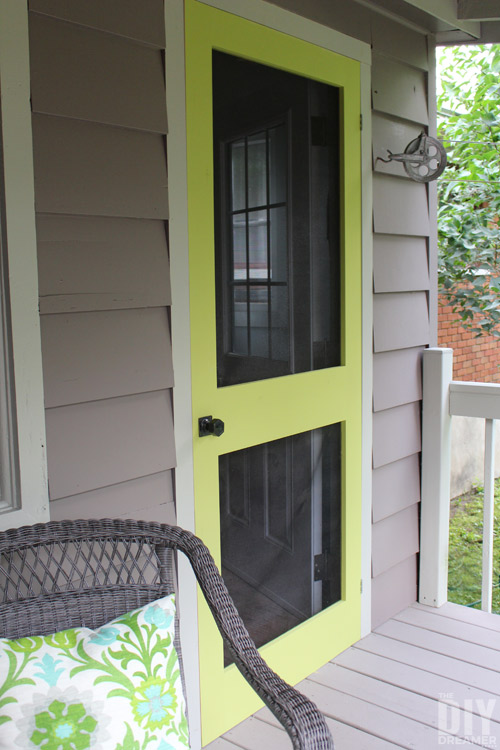
Isn’t it lovely? I love it so much! Wouldn’t a house number sign with doorbell look pretty next to it?
I love its design and I love the color. The Pistachio adds just the perfect punch of color to the porch.
I have a thing for that beautiful shade of green. I also painted our swing set the very same color.
I hope that I’ve inspired you to build your own screen door!
P.S. I have another great door for you to check out Barn Quilt Door!
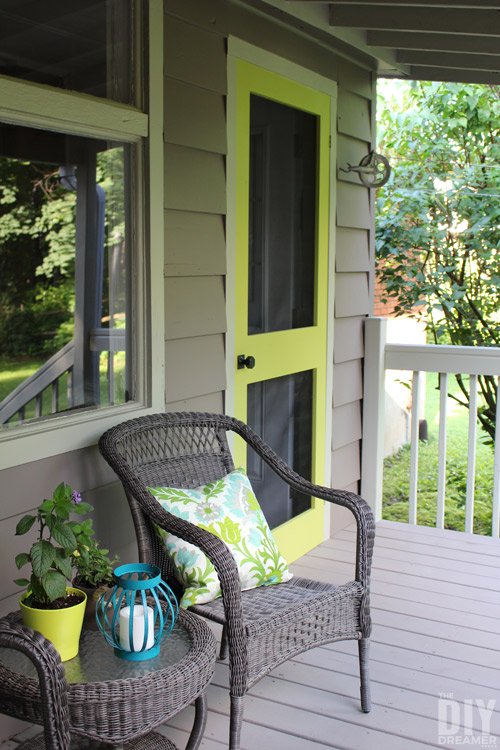
A few things have changed on our back porch since we shared our screen door. We have added a 2×4 outdoor bar table that we built along with DIY bar stools.
Have yourself a COLORFUL day!

Disclosure: A big THANK YOU to BEHR for sponsoring this post. As always, all opinions in this post are 100% my own.

How to Build a Screen Door
Learn how to build a screen door. Complete step by step tutorial to build a DIY screen door for your home.
Materials
- Wood (1x 1″x8″ 10′ and 2 1″x6″ 10′)
- [ Biscuits for plate joiner]
- Carpenter glue
- [ Screen mesh roll]
- Screen moulding (3/4″ 16′)
- Paint
- Hinges with screws
- Door handle
- [ Hydraulic door closer kit]
Tools
- Miter saw
- [ Table saw]
- Tape Measure
- Square
- Clamps
- [ Plate joiner]
- Hand saw
- Orbital sander
- Chisel
- Hammer
- [ Miter box]
- Stapler
- Nail gun
- Pencil
Instructions
- Cut wood (based on cut list in the notes below).
- Position the wood pieces on the ground.

- Clamp all the pieces together.
- Measure corner to corner diagonally to make sure the measurements are the same. Both measurements need to be the same for the door to be square. (The extra wood at the bottom allows for wiggle room if the door isn't quite square.)
- Make pencil markings where to add biscuit joints.
- The markings must run through each touching board. The smaller boards only need 1 biscuit joint.
- Wide boards need 2 biscuit joints.
- Remove clamps and use plate joiner to make biscuit holes by lining up the pencil markings.
- Apply carpenter glue inside each biscuit hole and edge. Place a biscuit inside.
- Fasten together screen door with clamps. Make sure to line up the pencil markings.
- Measure diagonal corners, making sure the measurements are the same.
- Once the glue is dry, remove the clamps, and use had saw to cut the extra wood at the bottom.

- Sand the screen door and all the joints.
- Dry fit the screen door and use a hand planer if it's too tight.
- Add hinges to the door by using a chisel to make notches for the hinges.
- Paint the screen door and screen moulding with outdoor paint. If there are knots in the wood, use a primer first. Let the paint dry.
- Use a miter box and hand saw to cut the screen moulding to size.

- Install screen mesh onto the back side of the door using a staple gun and screen moulding.
- Attach the door into place, install a door pull, and a hydraulic door closer.
- Enjoy the DIY screen door.
Notes
Please note screen door dimensions are based on my door frame opening. Measure your door frame opening and adjust cut list to the dimensions of your door frame.
- 2x 4″x80.5″
- 1x 4″x26″
- 2x 7.5″x26″
Recommended Products
As an Amazon Associate and member of other affiliate programs, I earn from qualifying purchases.
-
 DEWALT DW682K 6.5 Amp Plate Joiner
 -
 Touch 'n Hold Smooth - Standard Duty Door Closer for Storm & Screen Doors - Single Kit - New Doors or Replacement for previous units (White)
 -
 DocaScreen Standard Window Screen Roll – 36” x 100’ Fiberglass Screen Roll – Window, Door and Patio Screen – Insect Screen // Fiberglass Screening // Screen Replacement // Window Screens


Christine.
I absolutely LOVE the color of your door. It is just so fun. Also…..a quick silly question to ask. How did you manage to keep your door from warping? I have tried projects like this in the past, always buy the kiln dried wood and the better quality wood however it never fails, it warps every time. Thanks so much for the post and once again love the door.
That’s a great question about the wood warping. Did you find out the answer?
I didn’t have any issues with the wood warping. However maybe the it has to do with the climate here in Quebec. We used pine (if ever that makes a difference).
Maybe ask where you purchase your wood, I bet they would have suggestions.
Sorry I couldn’t really help! :/
I love this door – it’s so much more modern and sleek than those you see in stores, and the pop of color is perfect.
Funny I should see this post, my husband actually just built me a screen door, with the added addition of a built-in doggy door. We used scrap wood around the house so the only thing we had to purchase was the screen. Your door is certainly much prettier than ours, but hey it is functional, which is what counts.
I found you at Savvy Southern Style’s Wow Us Wednesday. This is a great tutorial! I may just have to give it a go!!
Wow Christine! This turned out so great and I absolutely love the color you picked. It is such a fun pop!
This looks amazing and your tutorial is outstanding!! Your post has been Pinned,Tweeted and shared on Facebook! It will be featured this week on the Friday Favorites Link Party at Mustlovehome.com. Come by and see your feature and share what you have been working on this week! The doors open Thursday at 7PM. Hugs – Christine at Must Love Home
This looks so great! I have been wanting a screen door and now I think I will have to make one!
Great tutorial! It adds so much to the front for your house and I love the fun color. If you haven’t already, hope you’ll come by and share at the HomeMattersParty – the door is OPEN until Monday end of the day.
Awesome DIY project, and I love the paint color you chose. This is being featured at our weekly link party this week.
Love the color you chose! Thanks for the great tutorial. This is on my to do list for the spring!
This is a wonderful tutorial! I know my husband will want to see this, and that once he does, we’ll be making our own screen door. I love the color your chose, too! It looks wonderful on your gray house! Pinning. :)
Great project! It looks awesome! Thanks for sharing at Home Sweet Home!
What a gorgeous door Christine! I love how simply and cottagy it looks. Perfection. Thanks so much for linking it up to our Bewitchin’ Projects Block party last week! Hugs, Lisa
Whats the plan when the screen rips? Seems a bit bothersome to pull off screen moulding then remove all staples and staple in new screen. It looks great and is something that i would be interesting in replicating. Curious if you thought about the screen replacing process?
I’m in need of a new screen door in the worst way. Thank you so much for the great tutorial. I know I can do this.
I love this door! Where did you find the black handle?
So happy you like it!! We didn’t buy the door handle, we found it on a door in our basement. It was a functional door handle, so we had to solder the handle to the square bracket to make it work for the screen door.
Front of the door looks great. It’s to bad you didn’t show the other side when finished. You show painted molding but not installed on the door. Why?
Hi John! I’m happy you like the door! :) Step 14 shows the moulding being installed and Step 15 shows it installed. Hope this helps. :)
Thank you. I was hoping to see the finished door from the back and front. Maybe next time?
No problem! I will take some photos and share them in the spring. Full winter mode here now. hehe
Hello Christine,
Okay, and thank you. I’m in Massachusetts and you are where? I will be waiting.
John
Promised my wife I’d make a new door for our screen room, she pesters me every six months about it. Guess I’ll just have to do it. Based on your build but I’m adding a 1×4 vertical to the bottom half. Thanks for posting and GREAT JOB!
Great looking door, would like to know if I sent you demensions would you cut and prep the wood so I can put it together, I’m kinda handicapped but won’t have any problems building, have my grandson,lol
Love this project and we need screen doors. I’m gonna do this because YOU inspired me! Thanks for great instructions :) Thank Dad too. :)
Thank you for sharing!