Rustic Twig Christmas Ornaments – Rustic Christmas Ideas!
I’m really into making simple things for the holidays this year. If you read my Decorative Twig Christmas Tree post, you know that we are on a budget this year so my decorations have to be inexpensive to make.

So you can imagine when my fellow Canadian blogger friends asked me to join in the Rustic Christmas Hop I said yes right away!
Rustic doesn’t necessary mean inexpensive, but to me it means going back to using simple things to create beautiful treasures.
With that in mind, I created these Rustic Twig Christmas Ornaments.
These little guys were absolutely EASY and FUN to put together.
You know how much I love easy creations!
I only needed twigs, burlap ribbon, branch cutters, and hot glue to make these Christmas ornaments. Not too bad right?!
This post contains some affiliate links for your convenience. Click here to read my full disclosure policy.
Rustic Twig Christmas Ornaments
Supplies:
- Twigs – Branches
- Branch cutters
- Hot glue gun
- Jute twine
Instructions:
Step 1: I started off by cutting branches down to twig size.

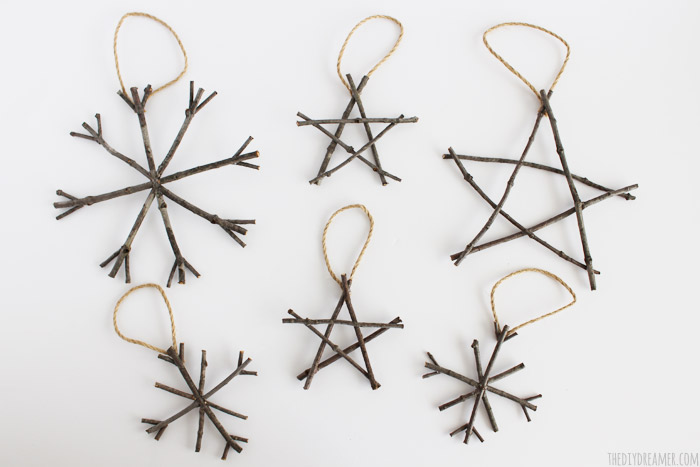
Step 2: I made two designs in two different sizes: snowflakes and stars. I used hot glue to attach the pieces together.
- Big Snowflake: 1x 8″, 6x 4″, and 16x 1″
- Big Star: 5x 8″
- Small snowflake: 1x 4.5″, 2x 2″, 4x 1.5″, and 8x ¾″
- Small Star: 5x 4.5″
For the snowflakes: I cut an angle on one end of some of the pieces, makes it easier to attach because the end can sit flush on a twig.

Step 3: Once all my Christmas ornaments were finished assembling, I cut pieces of jute twine and attached them to the back of the ornaments with hot glue. Easy peasy!


Voilà, rustic twig ornaments!
Rustic Twig Stars

Rustic Twig Snowflakes

All of them together:
Rustic Twig Ornaments
Because I love them so much, I even made a Giant Twig Star!
I used the same techniques as above, but used 5x 26″ branches!
I’m planning on making an even bigger one to hang outside.

UPDATE:
I liked my giant star so much that I made another one and hung it up with fishing wire on our decorative door.
Doesn’t it look beautiful?!
Giant Star – Rustic Christmas Branch Star

So, what do you think of my rustic creations? Not too bad right?!
I’m really pleased with how they turned out. I can’t wait to put the ornaments on.
Rustic Christmas
I did mention a Rustic Christmas hop didn’t I?!
You should see all the rustic projects my friends made, they are SOOOOOO talented!!
I love every single one of these projects! I’m sure you will too! Check them out:

Rustic Christmas Ideas
Santa Cookies from A Pretty Life in the Suburbs
Deer Head String Art from Clean and Scentsible
Vintage Door Advent from The DIY Mommy
Rag Ribbon Christmas Trees from Craftberry Bush
Rustic Christmas Tree from Fynes Designs
Christmas Window Box from Echoes of Laughter
Ribbon Napkin Rings from Suburble
Vintage Table Setting from The Sweetest Digs
Twig Stars and Snowflakes from The DIY Dreamer
Pretty Gift Wrapping from The Sweetest Escape
Rustic Wreath from North Story
Wood Block Presents from The Happy Housie
Winter Swag from Satori Design for Living
I sure hope you enjoyed all these beautiful Rustic Christmas Ideas!!
I have an entire Christmas projects page if you would like to check it out.
Have a FABULOUS day!!

P.S. I’ll be linking to these Parties.
Want even more rustic Christmas ideas?
Rustic Christmas Ideas
Deer Wood Slice Christmas Ornaments

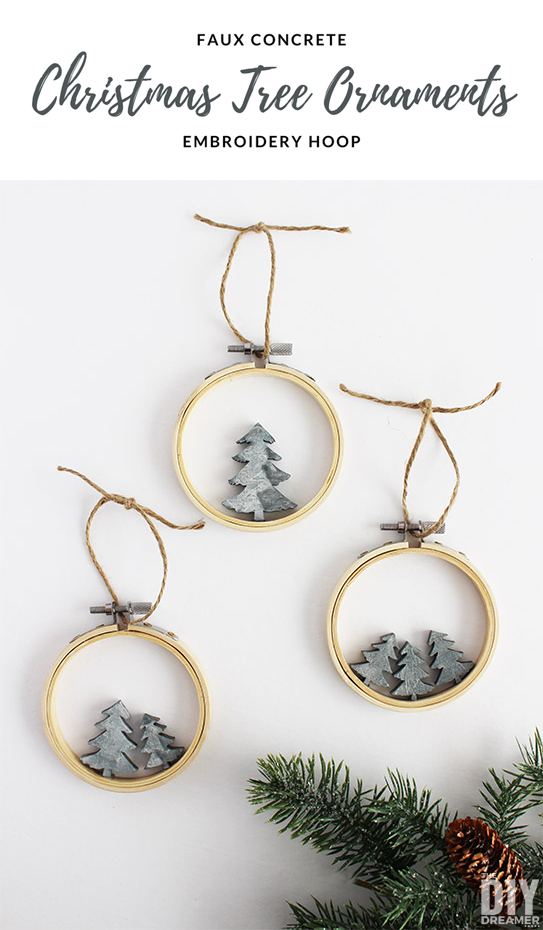
Embroidery Hoop Faux Concrete Christmas Tree Ornaments
3 Easy Homemade Christmas Ornaments

Faux Fur Pom Pom Christmas Ornaments

DIY Christmas Countdown Collection


Rustic Twig Christmas Ornaments
DIY Rustic Twig Ornaments. Christmas ornaments that are super easy to make. Learn how to make snowflakes and stars out of twigs for your Christmas tree.
Materials
- Twigs - branches
- Jute twine
Tools
- Pruning shears
- Glue gun
Instructions
- Cut branches to twig size with pruning shears.

- Cut twigs to make twig stars. Use cut list in the notes below.

- Cut twigs to make twig snowflakes. Use cut list in the notes below.

- Hot glue pieces together to make the stars and snowflakes.

- Add twin with hot glue to transform the shapes into ornaments.

- Hang the rustic twig Christmas ornaments on a Christmas tree.

Notes
- Big Snowflake: 1x 8″, 6x 4″, and 16x 1″
- Big Star: 5x 8″
- Small snowflake: 1x 4.5″, 2x 2″, 4x 1.5″, and 8x ¾″
- Small Star: 5x 4.5″
Recommended Products
As an Amazon Associate and member of other affiliate programs, I earn from qualifying purchases.
-
 gonicc 8" Professional Premium Titanium Bypass Pruning Shears (GPPS-1003), Hand Pruners, Garden Clippers.
 -
 AdTech Floral High Temp Full Size Glue Gun
 -
 Tenn Well 300Feet Natural Jute Twine 6 Ply Arts and Crafts Jute Rope Industrial Heavy Duty Packing String For Gifts, DIY Crafts, Festive Decoration, Bundling and Gardening


I’m with you on keeping everything simple for the holidays. These are going to look great on the tree. I’m starting to get quite the collection of twig/branch decor and I love how it brings the outdoors in.
These are SO great Christine! I am feeling the need to make a bunch of these now – they’re gorgeous!
Cute and easy!
These are beautiful, Christine! I love the simplicity of them!
What a great idea! They are so super cute, I would have never thought of the snowflakes! great tutorial and crisp photos!
These are super cute, Christine! I’ll have to make them with the kids! Beautiful pictures!
They are beautiful, I should start making ornaments, I like this project a lot.
I love this.
Super cute idea! I love the rustic look and all of your twig creations! Thanks for sharing! PINNED!
These are so cute – would look great on holiday packages.
These are really, really cute. I especially love the snowflake ones! I think decorating for Christmas on a budget is so fun – it gives us a chance to be creative and unique! Love these. :)
Hello Christine,
These are just beautiful! Visiting from Skip to my lou linky ;)
Cheers,
Ursula
Love these<3 I was going to buy craft sticks and make but your branch and twig idea is way cooler:) Pinned!
So creative!! Super cute idea! Pinned! Iky
What a clever idea! Handmade, inexpensive Christmas decorations are the best kind! I am totally going to copy this idea. Pinning it now too :) Happy Holidays!
LOVE this post! these look amazing!!
Had to come back (wait, I forgot to comment the first time? I must have been too excited!) and tell you I made this with my daughter today! And I shared with a friend and she can’t wait to do it too. Thanks for a great project – I’m so glad you posted to Found & Foraged!
Loving these rustic twig ornaments Christine! They are seriously cute! I just started co-hosting a link party called On Display Thursday that starts at 9pm CST on Wednesdays; it would be totally awesome if you shared this post at my party! Just sayin!
http://www.thedomesticheart.com
I LOVE these simple ornaments! I’m planning to make some twig stars to put on the top of my twine trees this year :) I’ll link back here to your tutorial when I do!
Lindi @ http://www.lovecreatecelebrate.com
I love the simplicity and elegance of this! This is exactly the kind of ornament I would go for! :) Thanks for linking this up at The Makers today!
These are so pretty! We would love for you to link up at the Caffeinated Crafters Link Party here:http://artzycreations.com/25-caffeinated-crafters-link-party/ Thanks and have a great day.
These are so cute. Love how simple they are.
I love the simple and natural look of these stars!
Oh what a great idea! We moved to a new house this summer and it has lots of trees. I may use this idea for my mantel! Thanks for sharing.
What cute ornaments….we just moved into our rustic home, and I was looking for rustic decorations for Christmas…Thank you so much for this post. We would love for you to join us at Party in Your PJs…I am sure other party goers would love these ornaments too.
Christine! These are so great! LOVE!
I love the rustic look on these! Nature always makes the best crafts, IMHO :)
Super Cute! I love Christmas ornaments!
I love your twig ornaments and a great tutorial newbie here from Ohio that loves to recycle
These are absolutely adorable Christine. I especially love the precious little snowflakes. I did a twig project recently and I had it half in mind to try this- I don’t think I could have gotten them to be so straight and cute. Great job!! Fun to be on this hop with you- sorry it took me so long to get over here! (Crazy couple of weeks:)
How cute! The kids would love making these!
Christine, wanted to come back and let you know I featured this as a favorite for Found & Foraged Week 1! Thanks again for linking up…my daughter and I made them together. I know I owe you a picture!!! They are so darling!
Love these! Pinning them right now. :) Thanks for this tutorial!
can’t wait to make these!