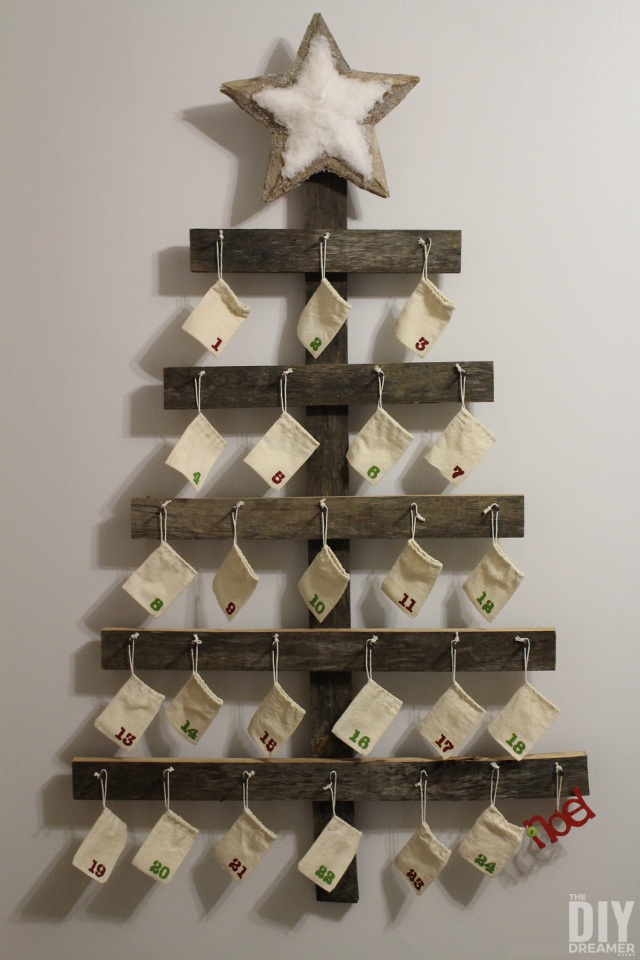
Wall Mounted Advent Calendar!!!


Learn how to make a DIY wall mounted advent calendar that will be treasured by your family for many years.

I’ve been buying chocolate advent calendars for years, however I never display them because they are tacky.
We usually hide them on top of the fridge and take them down each morning for the girls to open their special doors and then we place the calendars back in their hiding spot.
However, this year we decided to put and end to the chocolate advent calendars, instead… we created our very own DIY Advent Calendar.
Oh and not just an advent calendar but a huge 4 feet wall mounted advent calendar.

UPDATE – We painted our kitchen and our Rustic Wall Mounted Advent Calendar looks so good!

It’s really GORGEOUS!!
I wish I would have been able to take jaw dropping pictures, but there’s absolutely no sun today… just a grey snowy day. Trust me, it’s a lot nicer than it seems in the pictures.
I’m in AWWW every time I go in the kitchen and I see it mounted on the wall.
The wall mounted advent calendar looks wonderful in our newly painted kitchen next to the wood window cornice we made!

P.S. We made a new advent calendar this year!! We made a Fabric Advent Calendar with pockets wall hanging!
This post also contains some affiliate links for your convenience. Click here to read my full disclosure policy.
First Step: Gabrielle, Emanuelle and I started off by stenciling numbers onto 24 muslin bags.
Advent Bags
Supplies:
- 24 Muslin Treat Bags – The bags we bought were 3″x4″.
- Stencil
- Red & Green Paint
- Foam Brush
- Wax Paper

Instructions:
Step 1: Cut little pieces of wax paper to insert in each of the muslin bags. This is to prevent paint soaking through to the other side of the bag.

Step 2: Place your stencil on your bags and use a foam brush to paint on the appropriate numbers.

I painted the odd numbers in red and the even numbers in green.
And voilà, you have yourself some advent bags to put in little treats.

After the advent treat bags were finished, Sébastien and I started working on the advent calendar.
The advent calendar is a very easy and quick project… which I LOVE!!
Oh and Thank You to my Dad for coming over Tuesday after work to help me glue and attach the pieces. :)
Wall Mounted Advent Calendar
Supplies:
- Wood (check cut list below)
- Nails
- 25 Antique Nails (or rusty nails)
- Wood Glue
- Hammer
- Star of your choice. (The star I used was something I bought at a little store in Stowe, Vermont. It’s 12″.)
- Felt Pads (what you put under chair legs)
- Wine Corks (2)
- Hanging Kit from hardware store
- Christmas Ornament
Wood cut list:
- 1x: 48″ long by 2.5″ wide
- 1x: 32″ long by 2.5″ wide
- 1x: 28″ long by 2.5″ wide
- 1x: 24″ long by 2.5″ wide
- 1x: 20″ long by 2.5″ wide
- 1x: 16″ long by 2.5″ wide

Instructions:
Step 1: Cut all your pieces of wood.

Step 2: Hammer in your antique nails onto the 5 shortest pieces of wood. Make sure you leave them sticking out so you can hang your bags.
- 3 nails on the first piece.
- 4 nails on the second piece.
- 5 nails on the third piece.
- 6 nails on the fourth piece.
- 7 nails on the fifth piece.


Step 3: Glue and nail each piece onto the 48” long piece of wood.
Make sure you place them all centered and 5.5” apart and that you go from shortest to longest.

Step 4: Read the instructions of your hanging kit and place the appropriate piece onto your advent calendar and the other piece onto the wall.


Step 5: Turn over your advent calendar and place felt pads onto the back to protect your wall from scratches.

Step 6: Glue two wood spools (or wine corks) onto the back of the 32” piece of wood. This is to prevent the advent calendar from swaying side to side.
As you can see, I also added a piece of white felt behind the wood spool to protect the wall.

Step 7: Attach your star onto the top of the advent calendar.


Step 8: Hang it up onto the wall.

Step 9: Hang your advent treat bags and place your Christmas ornament onto the last nail.

Step 10: Put treats inside the advent bags.

And, what do you think of it??
Wall Mounted DIY Wall Christmas Tree


The girls are IN LOVE and they can’t wait to see what is in each bag!!
And I’m soooo PROUD OF IT!!! It’s going to be something we’ll get to keep forever!! Our very own DIY Family Heirloom.
If you want a different take on advent bags, these felt Christmas stockings are a great option! Just make them a little bigger to put treats in them.
P.S. We just made another super cool project! Check it out:
Outdoor Christmas Countdown Marquee Sign

Glass Mounted Christmas Countdown

Mini Christmas Countdown – Christmas Craft for Kids

Have a FABULOUS day and Merry Christmas!!


Wall Mounted Advent Calendar
Learn how to make a wall mounted advent calendar for your family. This DIY Advent Calendar is 4 feet tall.
Materials
- Wood (check cut list below)
- Nails
- 25 Antique Nails
- Wood Glue
- Star of your choice
- Felt Pads
- Wine corks or wood spools
- Hanging Kit from hardware store
- Christmas Ornament
- Advent bags
Tools
- Miter saw
- Hammer
- Nailer
- Hot glue gun
Instructions
- Cut wood to size using a miter saw.
- Add nails to the shorter pieces of wood. Make sure to leave them sticking it in order to hang the advent bags. See notes below.
- Glue and nail each piece onto the 48” long piece of wood. Make sure you place them all centered and 5.5” apart. Shortest to longest.
- Add d-ring hook on the back of the advent calendar and the hook onto the wall. Follow the instructions on the hanging kit packaging.
- Apply felt pads on the back of the advent calendar. This is to protect the wall from scratches.
- Glue two wood spools on the back of each end of the 32″ piece. This is to prevent the advent calendar from swaying.
- Attach the star on the top of the advent calendar.
- Hang the wall mounted advent calendar on the wall.
- Add advent bags on each nail.
- Insert treats inside the advent bags.
Notes
Cut list:
- 1x: 48″ long by 2.5″ wide
- 1x: 32″ long by 2.5″ wide
- 1x: 28″ long by 2.5″ wide
- 1x: 24″ long by 2.5″ wide
- 1x: 20″ long by 2.5″ wide
- 1x: 16″ long by 2.5″ wide
Nails:
- 3 nails on the 16″ piece.
- 4 nails on the 20″ piece.
- 5 nails on the 24″ piece.
- 6 nails on the 28″ piece.
- 7 nails on the 32″ piece.


What a fun Christmas tree that doubles as an advent calendar! You are so ingenious!
And it’s adorable too as a bonus.
Thanks for showing us!
hugs x
Crystelle
way to go Christine! way to go! it’s so awesome :) clap clap clap clap clap!!!!
This is perfect! I love how rustic it is. I’d love it if you’d link this up to my blog party =)
http://www.accidentallywonderful.blogspot.com
Love this idea.. Such a great advent calendar.
Thanks for linking up at Friday Fun Party. :)
Christine, I love this project. I love the rustic and simpleness of it! Very well done! I’m hosting a homemade holiday party with prizes and I think this project would be a great one to share. I’d love if you’d stop by.
http://4you-withlove.blogspot.com/2012/12/homemade-holiday-party.html
Have a wonderful day
Marilyn
This is a really cute idea. I’m pinning so I can remember it for next year! Thanks.
I love this idea. It is completely adorable.
Ruth
WOW Christine, no matter what you say about the pics that is amazing. Awesome advent!
LOVE IT! I have always wanted to make my own. My kids are allergic to nuts and you can never find one of those chocolate ones in the store that doesn’t contain them or isn’t made on the same equipment :(. Yours is so cute!! I can’t wait to do my own version!
This is…without a doubt….my favorite Advent Calendar I’ve come across. Been looking for ideas for a long time…and this is the one I will make. Thanks for sharing!
Homa Style is having a 12 Days of Christmas link party going on now.
I would love it if you linked up your advent tree.
The link is
http://homastyle.com/wp/2012/12/01/12-days-of-christmas/
great idea!! this would be a cool memory- and take a pic of the kids with it each year as they grow!
You’re crazy talented! LOVE!! Featured it! XO
http://lollyjane.com/30-diy-christmas-advent-calendars/
This is so pretty! Looks like it’s out of a catalog :o) I just featured you this morning on my Facebook page, so make sure to grab a featured button!
Thanks for partying with us @ Keep Calm & Link Up! Have an awesome week :)
xo, Meredith @ http://www.waittilyourfathergetshome.com
Beautiful!! Great job, Christine! What a wonderful tradition to enjoy and look forward to for years to come!
YEA Christine! I’m so glad you linked this project up! It always makes me smile when I see it! Thanks for sharing at the homemade holiday party.
Marilyn
4you-withlove.blogspot.com
It really is so cute! I love how it turned out. Great work. I feel like you can never have too many advents!
This is SO cute!! Hope you can link up at my trendy tuesday party!! http://www.sweetlittlegals.com/2012/12/trendy-tuesday-15.html
Me…do you really have to ask!?!? :) I’m obsessed with it…I’ve been wanting one for over a year now…I’ll be a good friend though and not get all green with envy! Featuring you tonight on my tree roundup! XO, Aimee
That is adorable. Thanks for sharing. Linked up with you from A Glimpse Inside!
What a fun project, Christine!! I would love for you to link this post to my Tasty Thursdays linky party going on right now. Thanks, Nichi
http://mandatorymooch.blogspot.com/2012/12/tasty-thursdays-20.html
Christine, I really love this idea! Looks great.
<3 Christina
What a cool idea! I am featuring you today. Thanks for linking up at Doodles & Stitches :)
This is awesome!! I always love a good advent calendar! Thanks so much for coming out to the party at Clean and Scentsible. I will be featuring this on my Facebook page and pinning. Happy Holidays!!
Jenn :)
What a great advent calendar :)
I really love this! I had to do away with my Advent Calendar plans for this year because I was just too frazzled by November 29th trying to put it all together. I’m going to have to pin this so I can make one in like July when I’m trying to find something to do. Great job!
Very cute advent calendar.
aw this is adorable and what a great idea! Thank you so much for sharing this idea on Handmade Tuesdays @ Ladybug Blessings http://www.ladybug-blessings.com
Great idea and nice tutorial.
Thanks for linking up at the Adorned From Above Blog Hop.
Adorned From Above,
Debi.
The Busy Bee’s,
Myrna and Joye.
This is amazing! I love how it seems simple to make, but is so eye catching and looks store bought!
Beautiful! And awesome tutorial, thanks:)
Katie
http://www.funhomethings.com
Hi Christine,
I love this advent calender. It is so cute. Thanks so much for sharing at Wednesday’s Adorned From Above Blog Hop.
Debi @ Adorned From Above
Joye and Myrna @ The Busy Bee’s
Linda @ With A Blast
Hey Christine! What a great idea!!! I love it.
Thanks for linking up last week at the Humble Brag. You were featured, so be sure to stop by and grab a button!
Hope you’ll come back tomorrow to link up. Also the Silhouette Cameo giveaway ends this weekend!
You’re killing me with your awesomeness! LOVE this! So pretty and something I would love seeing on my wall! Thanks so much for linkin up lovely :) XOXOX
I featured you in my blog today! http://digitalcakecrafting.blogspot.com/2013/01/shout-out-sunday-new-feature.html
Giving a little shout out :)
LOVE THIS!!! The wood that you used was it something you had on hand, or did you purchase it? Thanks so much!!
Your calendar is so adorable! It looks like something I could actually do. Thanks for sharing the pictures and instructions with us here.
Great advent! Where did you find the wood you used?